Calabash 使用 calabash 测试开源中国 Android 客户端
Calabash-android 是支持 android 的 UI 自动化测试框架,前面已经介绍过《中文 Win7 下成功安装 calabash-android 步骤》,这篇博文尝试测试一个真实应用:开源中国客户端。目的是和大家一起学习 calabash 测试工具。
测试环境与源码准备
先介绍一下 oschina.net

oschina 除了有网站,还有三大平台手机客户端:

客户端已经开源!
那么开源可以用来做什么呢?
我正在学用 calabash-android,得找到一个合适的待测 app,平时手机上开源中国这个 app 用的蛮顺手了,所以就选它了,在此特别向开源中国的开发工程师致谢!
环境准备:ADT+calabash-android
可以参考:
中文 Win7 下成功安装 calabash-android 步骤
下载 oschina/android-app 源代码
首先到 http://git.oschina.net/oschina/android-app ,
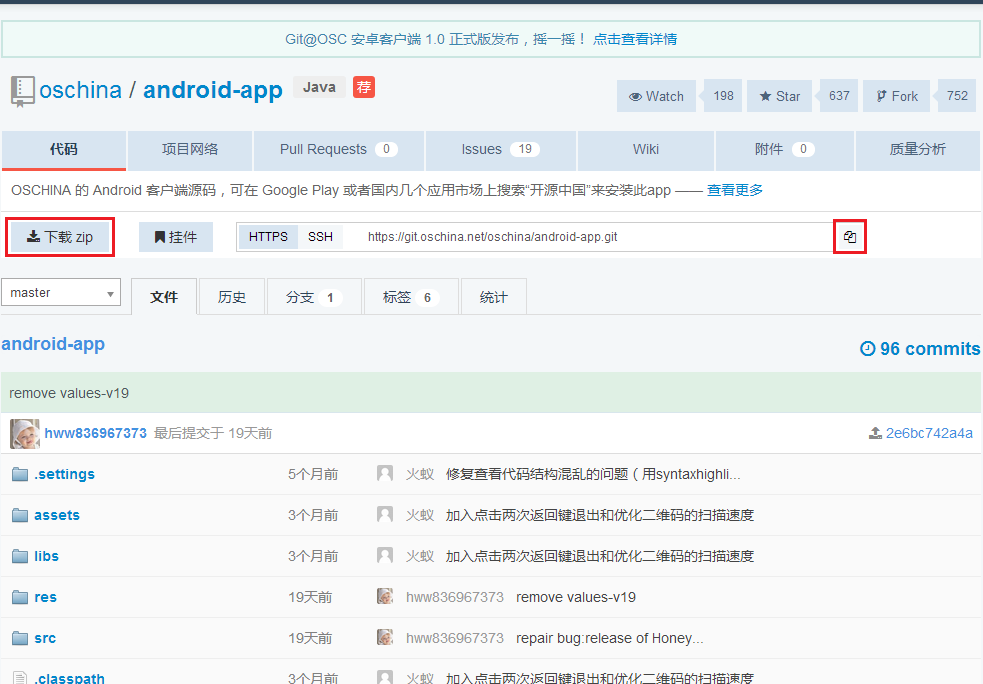
以下两种下载源代码方式的方式都可以:
- 可以直接点击” 下载 zip“
- 复制 git 仓库 url: https://git.oschina.net/oschina/android-app.gitEclipse/ADT 中打开 Windows,然后在 > Open Perspective > Other... > Get Resporsitory Exploring,clone 源代码
导入到 ADT 中后,源代码如下:
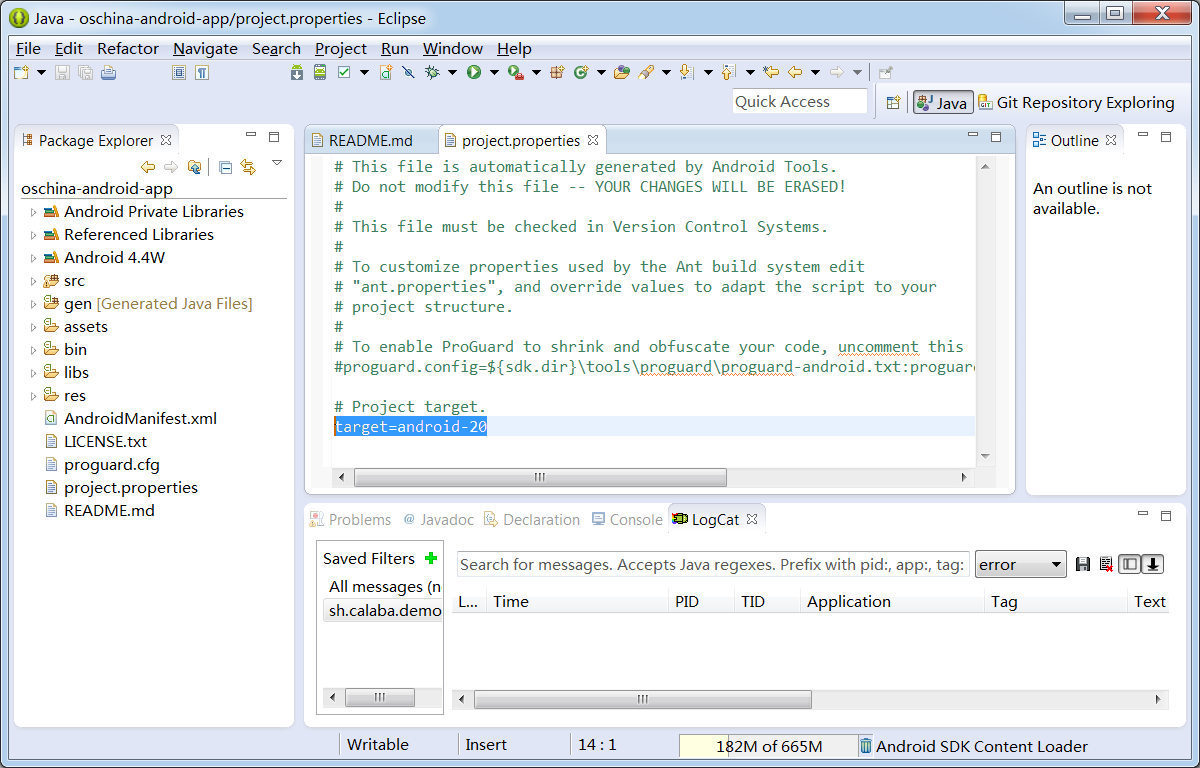
在 adt-bundle-20140702 中编译运行 oschina/android-app 的几个问题
问题 1: adt-bundle-20140702 的 API 版本是 20,所以要修改 project.properties:
target=android-15 改成 target=android-20
问题 2: 源代码是使用了已作废的 class: android.webkit.CacheManager
oschina-android-app/src/net/oschina/app/AppContext.java 中使用了 android.webkit.CacheManager
所以要把相关代码禁掉:
61 行:
//import android.webkit.CacheManager;
1503 到 1509 行:
//      File file = CacheManager.getCacheFileBaseDir();
//      if (file != null && file.exists() && file.isDirectory()) {
//          for (File item : file.listFiles()) {
//              item.delete();
//          }
//          file.delete();
//      }
问题 3:Run As Android Application 报错:Installation error: INSTALL_FAILED_VERSION_DOWNGRADE
原因是:手机已经装了一个开源中国的1.7.7.0 版本,而 ADT 要下载的是 1.7.6.9 版本,Android 系统不允许安装一个比已安装版本更旧的版本,所以从手机上卸载已有的1.7.7.0 版本就可以了。
ADT 编译并上传 oschina/android-app 到手机
Run As Android Application > 选择连接到电脑 Usb 的手机 > OK

#calabash 测试步骤
先确认 oschina/android-app 声明了访问网络的权限
oschina/android-app 项目的 AndroidManifest.xml 中应该如下行:
<uses-permission android:name="android.permission.INTERNET" />
在 oschina/android-app 根目录中创建 calabash 目录
在命令行下进入 oschina/android-app 的源代码根目录:
D:\git\oschina>cd android-app

D:\git\oschina\android-app>dir
 Volume Serial Number is 9823-AB19

 Directory of D:\git\oschina\android-app

2014/09/01  20:26    <DIR>          .
2014/09/01  20:26    <DIR>          ..
2014/09/01  20:21               783 .classpath
2014/09/01  20:21    <DIR>          .git
2014/09/01  20:21                64 .gitignore
2014/09/01  20:21               822 .project
2014/09/01  20:21    <DIR>          .settings
2014/09/01  20:21            10,829 AndroidManifest.xml
2014/09/01  20:21    <DIR>          assets
2014/09/01  20:42    <DIR>          bin
2014/09/01  20:26    <DIR>          gen
2014/09/01  20:21    <DIR>          libs
2014/09/01  20:21            18,092 LICENSE.txt
2014/09/01  20:21             1,424 proguard.cfg
2014/09/01  20:41               563 project.properties
2014/09/01  20:21             4,183 README.md
2014/09/01  20:21    <DIR>          res
2014/09/01  20:21    <DIR>          src
               8 File(s)         36,760 bytes
              10 Dir(s)  133,131,993,088 bytes free

D:\git\oschina\android-app>
创建 calabash 目录:
D:\git\oschina\android-app>mkdir calabash
创建 cucumber skeleton:
D:\git\oschina\android-app>cd calabash

D:\git\oschina\android-app\calabash>calabash-android gen

----------Question----------
I'm about to create a subdirectory called features.
features will contain all your calabash tests.
Please hit return to confirm that's what you want.
---------------------------


----------Info----------
features subdirectory created.
---------------------------

D:\git\oschina\android-app\calabash>dir
 Volume Serial Number is 9823-AB19

 Directory of D:\git\oschina\android-app\calabash

2014/09/01  21:54    <DIR>          .
2014/09/01  21:54    <DIR>          ..
2014/09/01  21:54    <DIR>          features
               0 File(s)              0 bytes
               3 Dir(s)  133,131,988,992 bytes free

D:\git\oschina\android-app\calabash>
编辑 D:\git\oschina\android-app\calabash\features\my_first.feature:
初始内容:
Feature: Login feature

  Scenario: As a valid user I can log into my app
    When I press "Login"
    Then I see "Welcome to coolest app ever"
第一行 Feature: XX,第二行 Scenario: YY 是给人读的,所以随便填写什么中文英文内容都可以
关键内容是第三行 When I press ..和第四行 Then I see .., 这是给 Cucumber 软件识别的。
When 后面跟动作语句,Then 后面跟内容检查语句
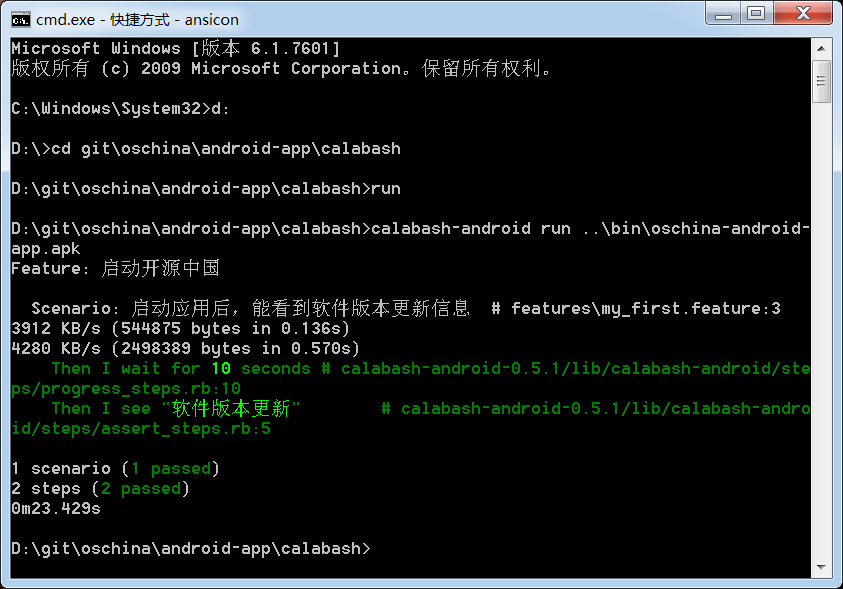
先尝试如下改动:
Feature: 启动开源中国

  Scenario: 启动应用后,能看到软件版本更新信息
    Then I see "软件版本更新"
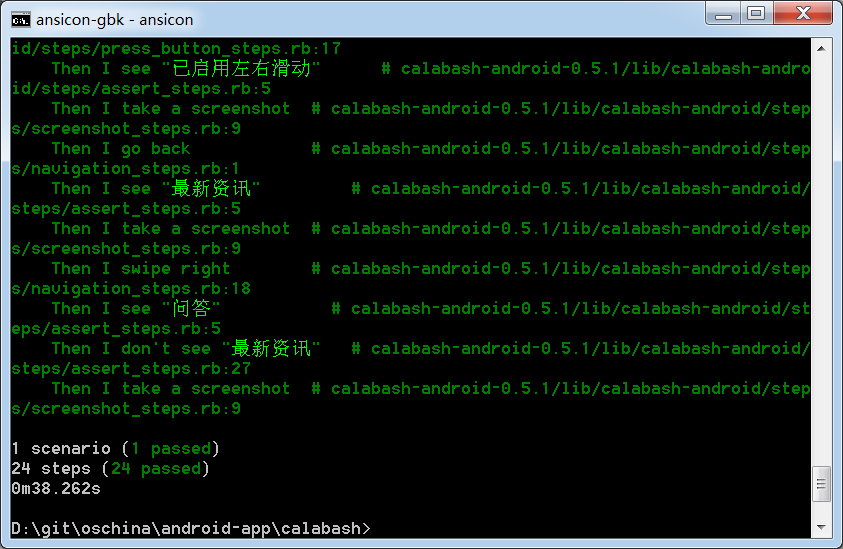
用 %windir%\system32\cmd.exe /k chcp65001&&ansicon 启动 ansicon,
运行 calabash-andriod run
D:\git\oschina\android-app\calabash>calabash-android run D:\git\oschina\android-app\bin\oschina-android-app.apk
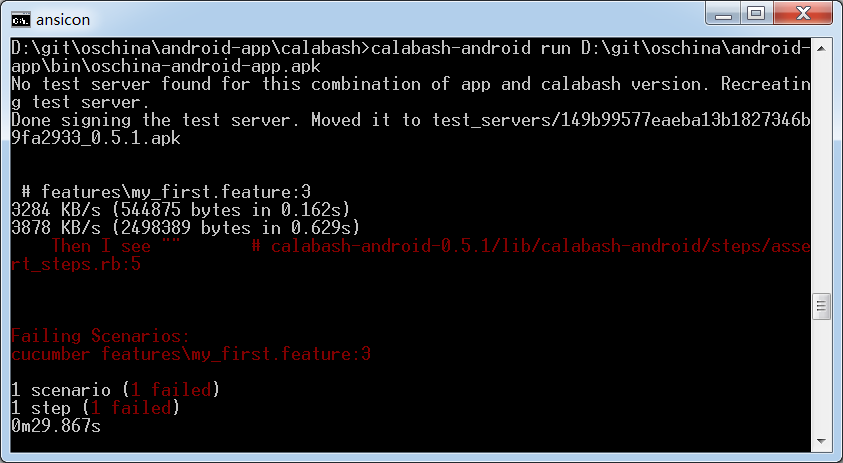
测试失败,原因是 Then 的默认等待时间只有 2 秒,开源中国 app 的启动时间比较长。
ansicon 中未能显示中文:"软件版本更新",这个后面补充中有描述。
按照 https://github.com/calabash/calabash-android/blob/master/ruby-gem/lib/calabash-android/canned_steps.md的指导,可以指定等待几秒:
Feature: 启动开源中国

  Scenario: 启动应用后,能看到软件版本更新信息
    Then I wait for 10 seconds
    Then I see "软件版本更新"

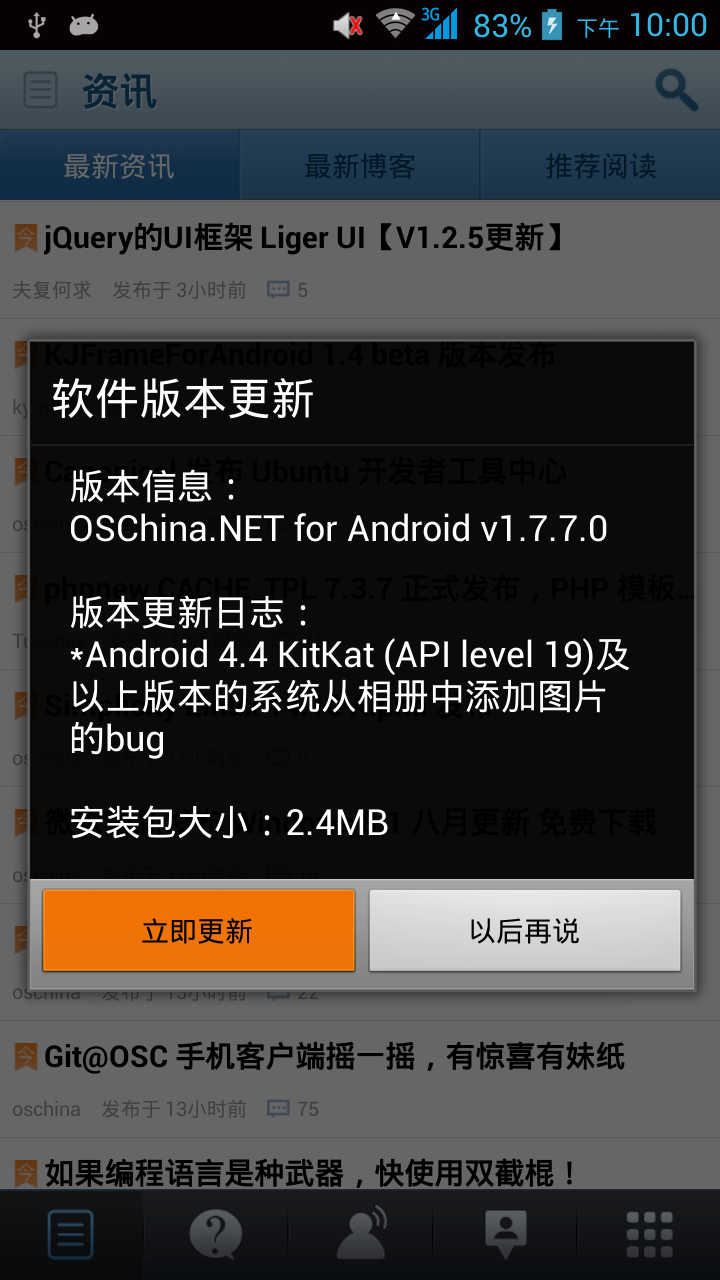
手机上看到的开源中国启动后画面:
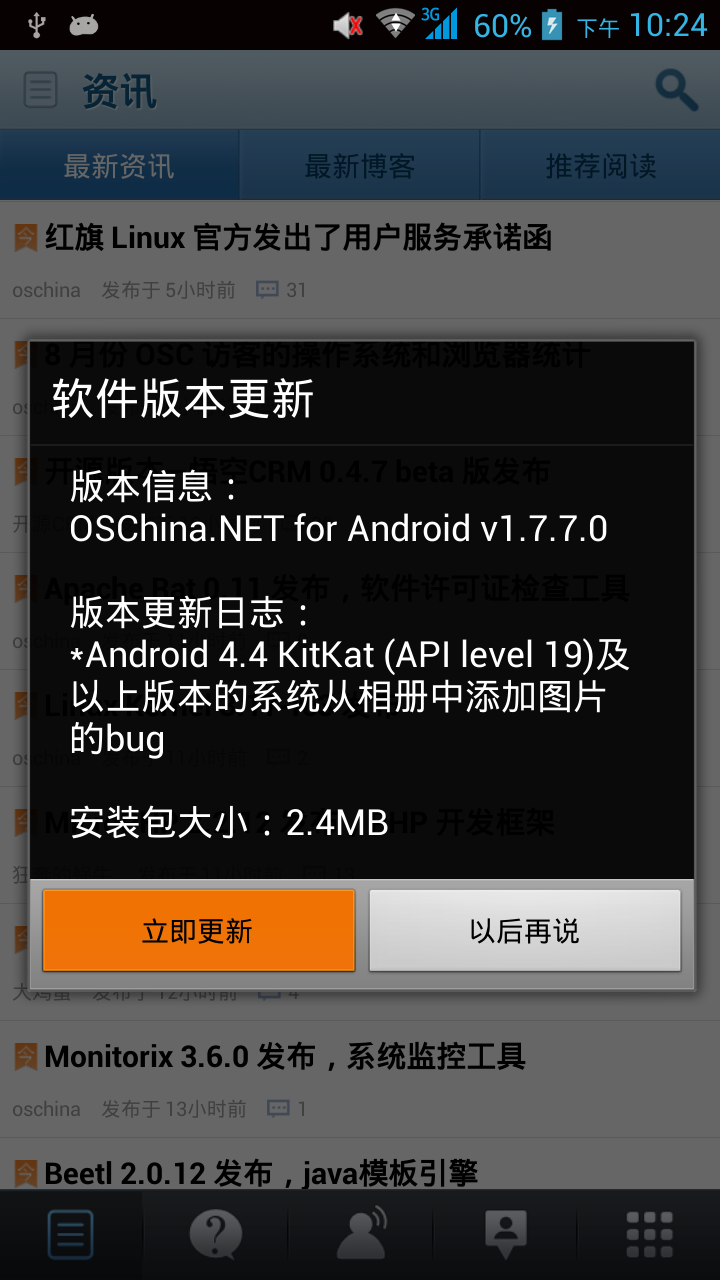
按钮 “立即更新” 为什么是红色的?以后再解决。
到此步为止,calabash 测试开源中国 Android 客户端的环境已经建立完毕,接下去同学们就可以欢快的尝试 canned_steps.md 里的各个预定义步骤了。
我也会继续完成这个测试用例,大家一起共同进步!
补充解决问题:calabash 测试输出中不能显示中文
解决方法:
ansicon 启动时,不要用chcp 65001设置为 UTF-8 编码,
用 %windir%\system32\cmd.exe /k ansicon 启动 ansicon,然后运行 calabash:
试用 calabash 预定义指令
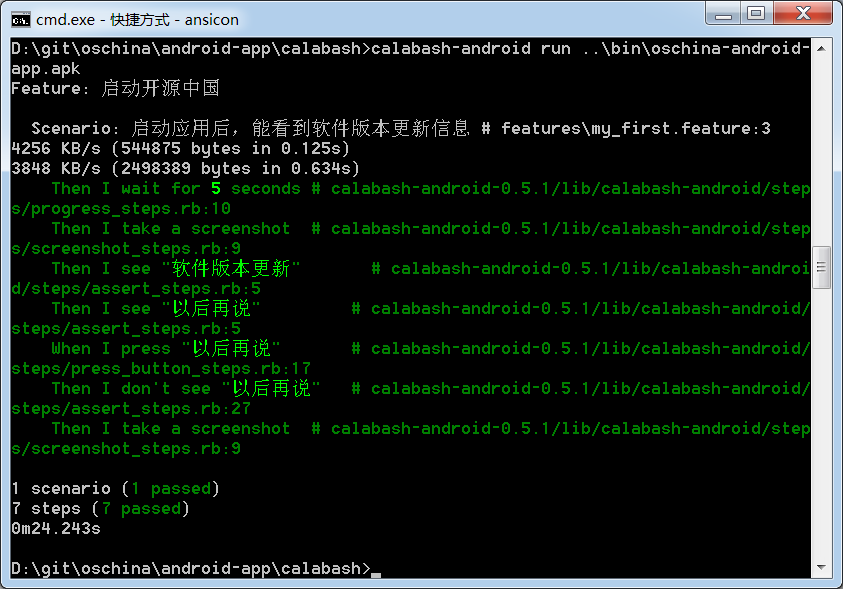
试用 press, don't see, screenshot
运行前,先把 D:\git\oschina\android-app\calabash 下的 screenshot_*.png 都删了,避免搞不清楚旧图和新图。
不解释,看脚本和截图:
Feature: 启动开源中国

  Scenario: 启动应用后,能看到软件版本更新信息
    Then I wait for 5 seconds
    Then I take a screenshot
    Then I see "软件版本更新"
    Then I see "以后再说"
    When I press "以后再说"
    Then I don't see "以后再说"
    Then I take a screenshot
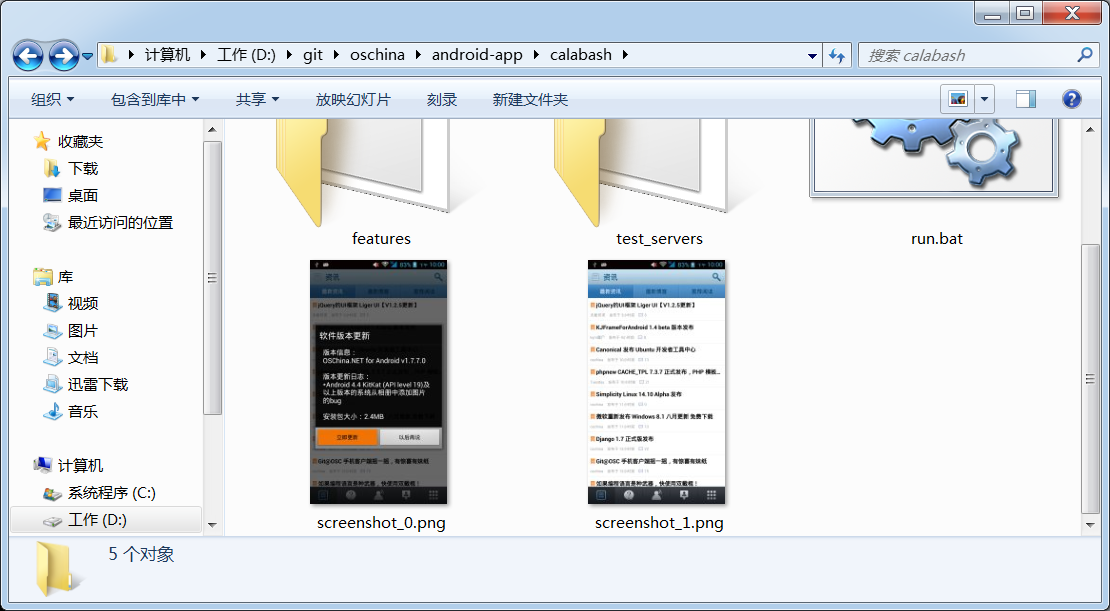
calabash 脚本生成的手机截图:
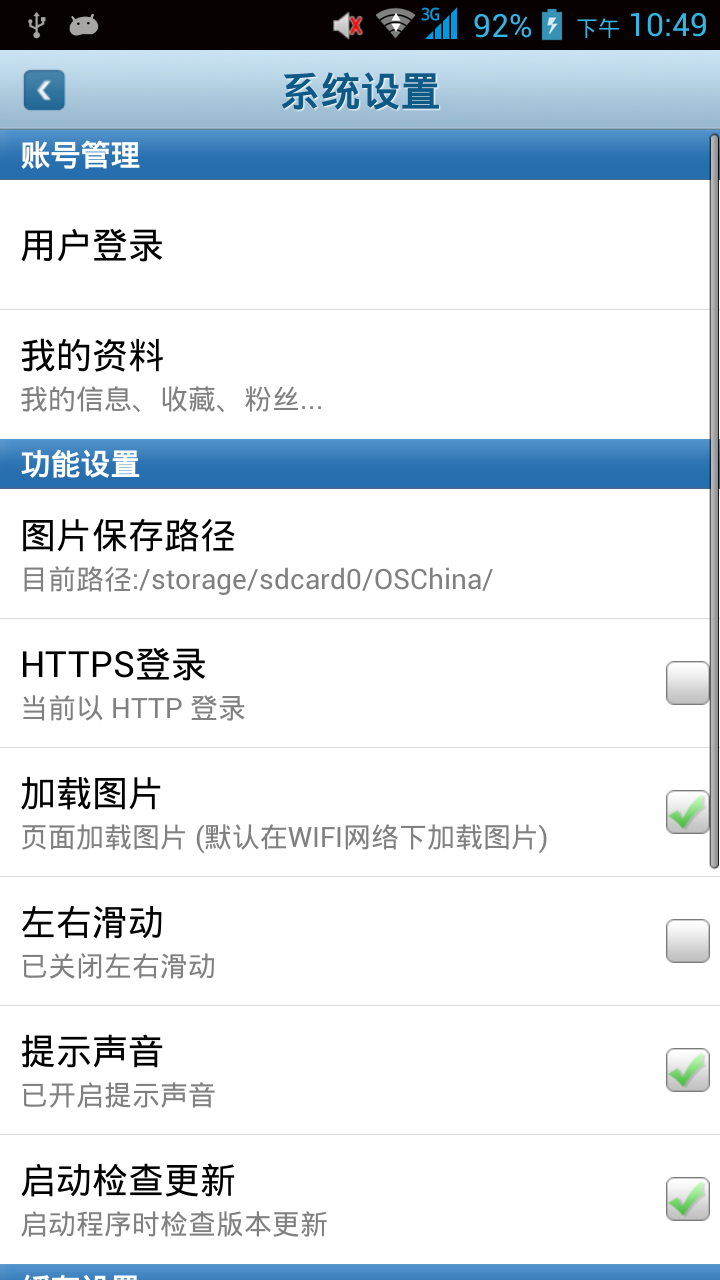
到系统设置中启用左右滑动,为了后面测试手势指令
Feature: 启动开源中国
Scenario: 启动应用后,能看到软件版本更新信息
Then I wait for 5 seconds
Then I see "软件版本更新"
Then I see "以后再说"
Then I take a screenshot
When I press "以后再说"
Then I don't see "以后再说"
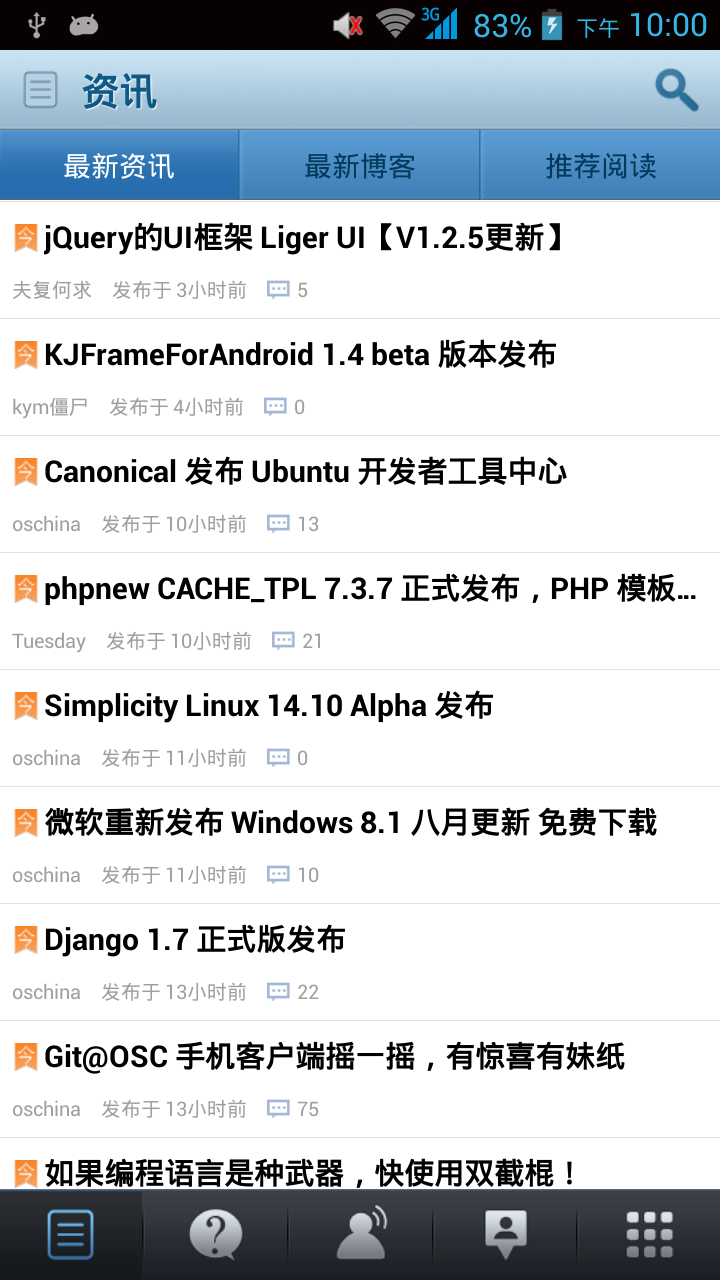
Then I see "最新资讯"
Then I take a screenshot
Then I press the menu key
Then I see "系统设置"
Then I take a screenshot
When I press "系统设置"
Then I see "已关闭左右滑动"
Then I take a screenshot
When I press "已关闭左右滑动"
Then I see "已启用左右滑动"
Then I take a screenshot
Then I go back
Then I see "最新资讯"
Then I take a screenshot


手势:swipe right = 翻看右边的内容
这个 right 比较难理解,是不是解释为 “翻看右边的内容” 比较容易记住。
Feature: 启动开源中国
      ...
      Then I swipe right
      Then I see "问答"
      Then I don't see "最新资讯"
      Then I take a screenshot

scroll up 运行失败
Then I scroll up
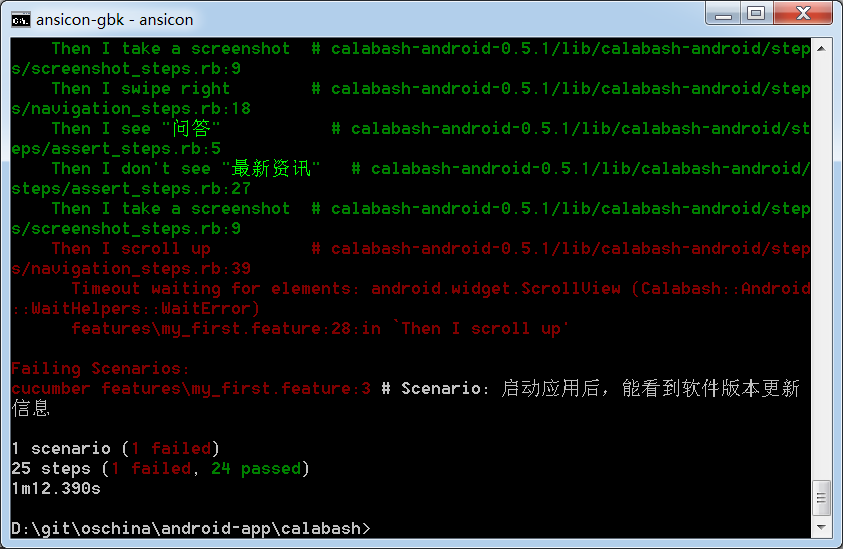
找不到 android.widget.ScrollView 元素,看样子 oschina 的可滚动区域不是用标准控件实现的。
通过 id 找到控件并做相应操作
接下去我要搜索包含"calabash"的博客,
首先要点击首页右上角的放大镜图标:

这个图标上没有 text 可以识别,所以必须到首页布局文件 mail.xml 中找到搜索图标的 id,
ADT 中打开文件:D:\git\oschina\android-app\res\layout\main.xml
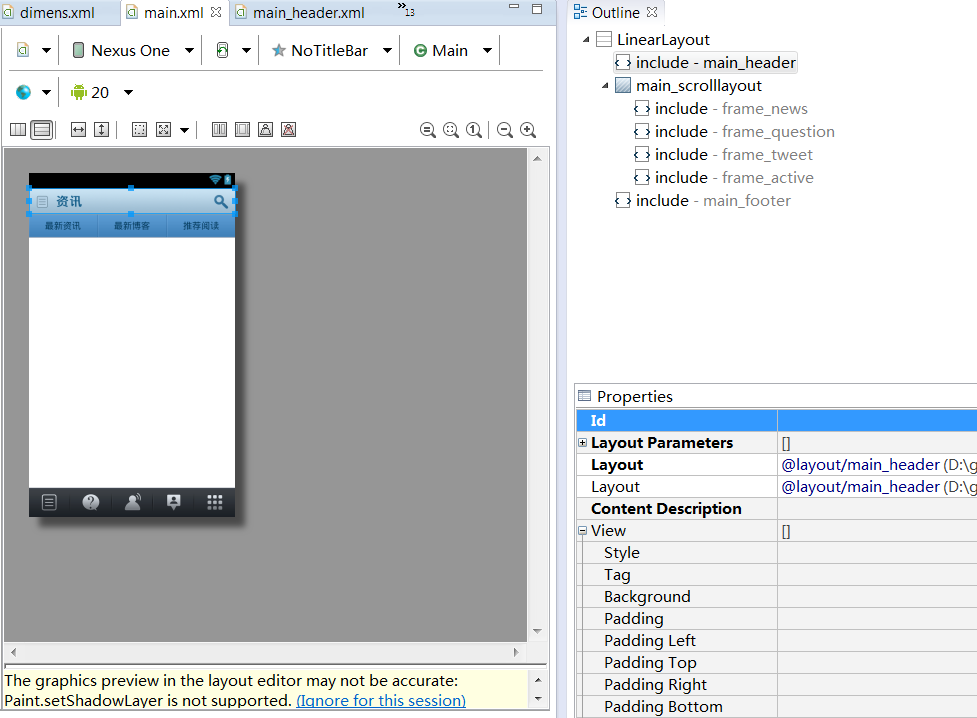
点击搜索图标,右上角的 Outline 指示搜索图标在 main_header.xml 中定义。
双击 include-main_header,ADT 打开 main_header.xml:
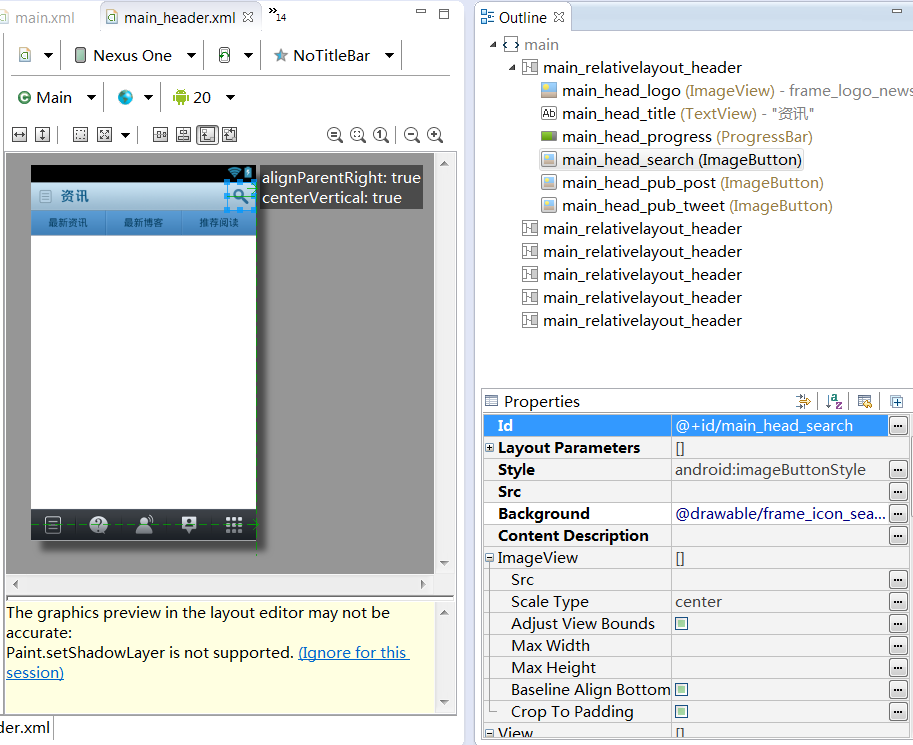
点击搜索图标,右边的 Outline 和 Properties 区都指示搜索图标的 id 是 main_head_search,控件类型是:ImageButton
接下去在 calabash 中可以用 id 点击搜索图标了:
Feature: 搜索包含calabash的博客
Scenario: 启动应用后,能搜到包含calabash的博客
Then I wait for 5 seconds
Then I see "软件版本更新"
Then I see "以后再说"
Then I take a screenshot
When I press "以后再说"
Then I don't see "以后再说"
Then I see "最新资讯"
Then I take a screenshot
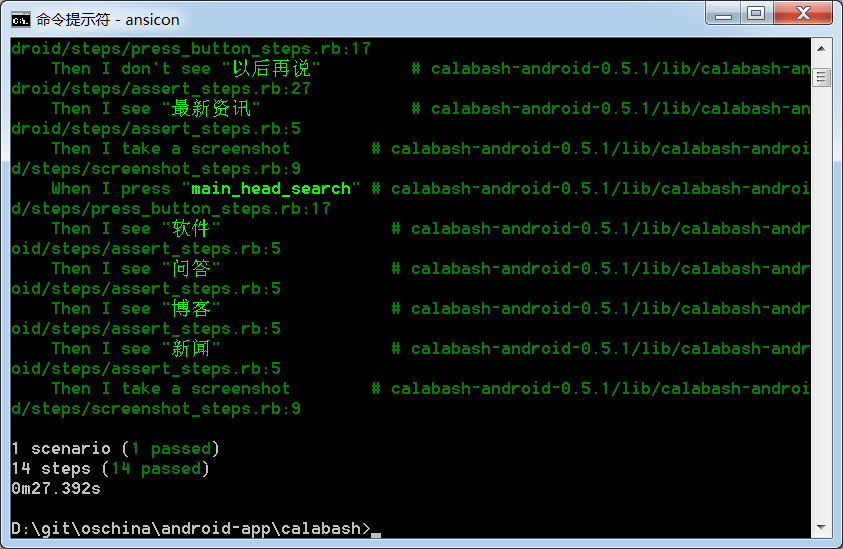
When I press view with id "main_head_search"
Then I see "软件"
Then I see "问答"
Then I see "博客"
Then I see "新闻"
Then I take a screenshot


我尝试了把I press view with id "main_head_search" 改成 I press "main_head_search",也能找到该搜索图标。
说明:I press "text/id" 是万能语法,同时支持文本和 id 定位控件。那我就不用再记住复杂语句I press view with id "main_head_search"了。
输入文本并按回车键搜索
Feature: 搜索包含calabash的博客
    ...
    When I enter "calabash测试" into input field number 1
    Then I take a screenshot
    When I press the enter button
    Then I see "已加载全部"
    Then I take a screenshot
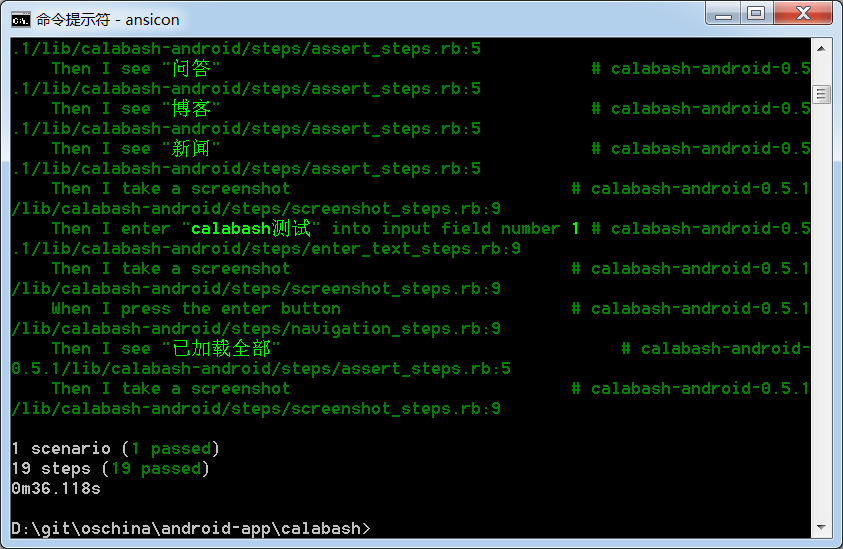

这里的enter button 就是软键盘上的"搜索"键。
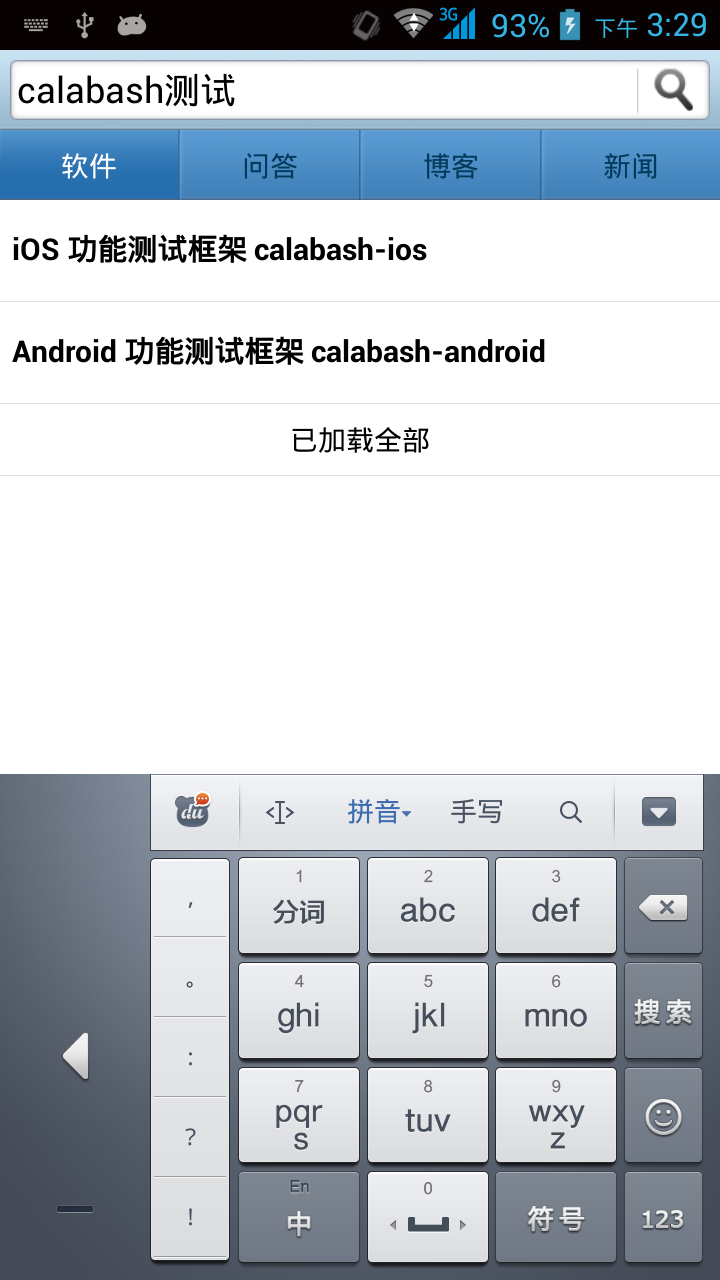
注意: 用 index 查找控件,是从 1 开始的,而不是像 C/Java 数组的元素下标那样从 0 开始。
为了验证 index 从 1 开始,下面再尝试登录
Feature: 登录开源中国
Scenario: 启动应用后,输入账号和密码能登录开源中国
Then I wait for 5 seconds
Then I see "软件版本更新"
Then I see "以后再说"
Then I take a screenshot
When I press "以后再说"
Then I don't see "以后再说"
Then I see "最新资讯"
Then I take a screenshot
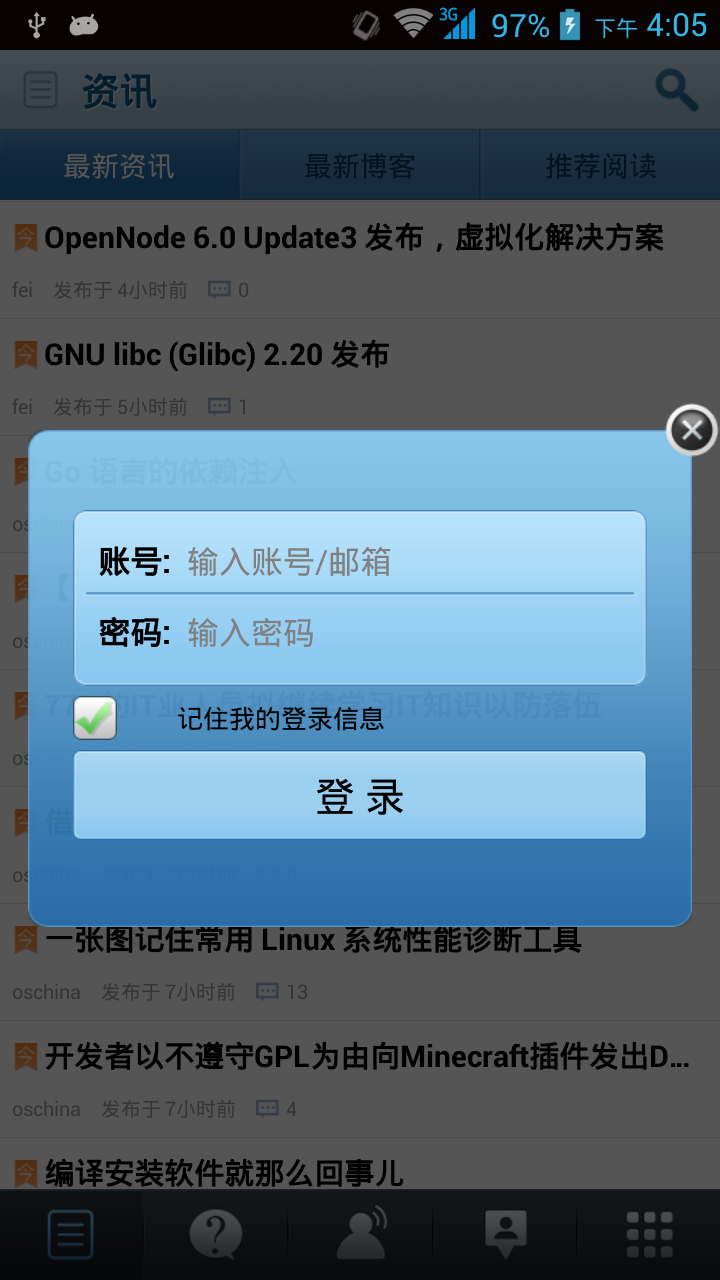
Then I press the menu key
Then I see "用户登录"
Then I take a screenshot
When I press "用户登录"
Then I see "记住我的登录信息"
Then I take a screenshot
When I enter "username" into input field number 1
And I enter "123456" into input field number 2
And I press button number 2
Then I see "登录失败用户名或口令错"
Then I take a screenshot
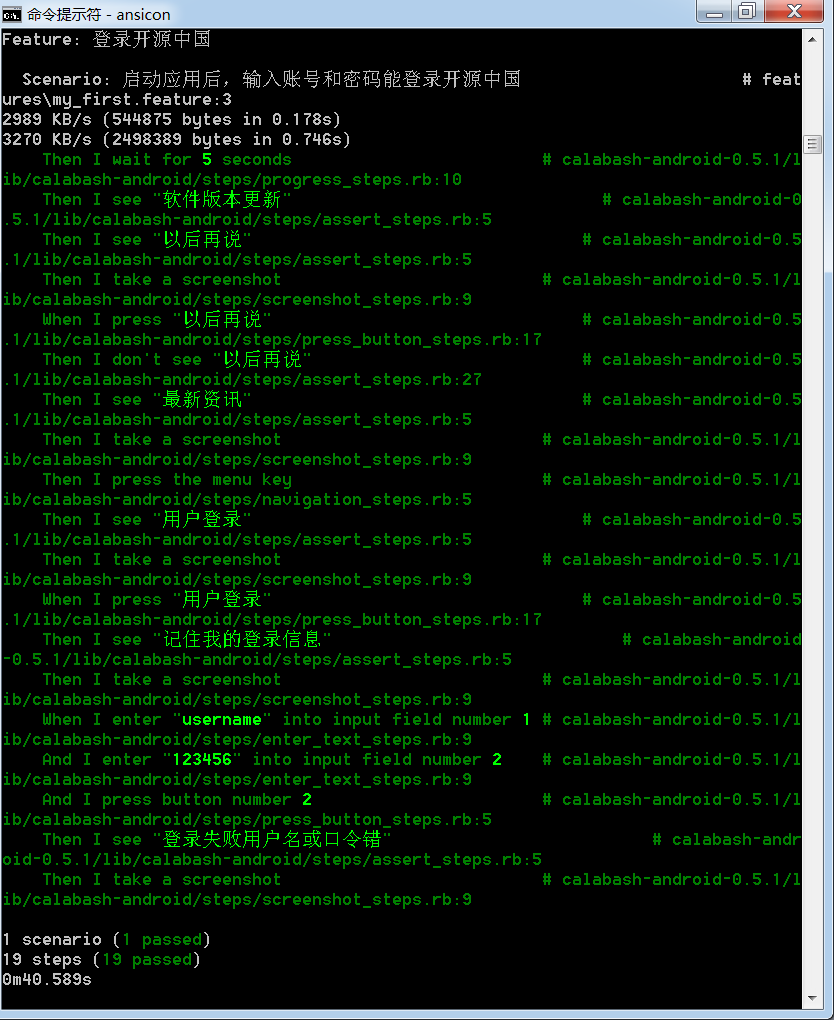

说明:
- 登录窗口中,有两个输入框:"账号"和"密码",index 分别是 1 和 2
- 登录窗口中,有两个 button:"记住我的登录信息"和"登录",index 分别是 1 和 2,checkbox 也是 button,奇怪吧?
- 尝试
I press "登录"定位登录按钮失败
calabash 测试集管理
一个 Feature 下包含多个 Scenario
把 D:\git\oschina\android-app\calabash\features\first.feature 改名为 startup.feature,内容如下:
Feature: 启动开源中国

  Scenario: 首次启动应用后,启用左右滑动
    When I wait up to 5 seconds to see "软件版本更新"
    Then I see "以后再说"
    Then I take a screenshot
    When I press "以后再说"
    Then I don't see "以后再说"
    Then I see "最新资讯"
    Then I take a screenshot
    Then I press the menu key
    Then I see "系统设置"
    Then I take a screenshot
    When I press "系统设置"
    Then I see "已关闭左右滑动"
    And  I see "启动检查更新"
    Then I take a screenshot
    When I press "已关闭左右滑动"
    Then I see "已启用左右滑动"
    When I press "启动检查更新"
    Then I take a screenshot

  Scenario: 第二次启动应用后,往右滑动到"问答"
    When I wait up to 5 seconds to see "最新资讯"
    When I swipe right
    Then I see "问答"
    Then I take a screenshot
本 Feature 有两个 Scenario:
- 第一个在系统设置中启用左右滑动,关闭启动时检查更新
- 第二个往右滑动到 “问答” 页
需要说明的是:
- 每个 Feature 在运行前都会退出 app,卸载 app,重装 app,启动 app
- 每个 Scenario 在运行前都会退出 app,启动 app
-
I see "启动检查更新"只有在 1280x720 分辨率的手机上才能看到;854x480 的手机上看不到,会运行错误。
一次运行多个 Feature 文件
按照 http://www.cnblogs.com/puresoul/archive/2011/12/28/2305160.html 的《Cucumber 入门之 Gherkin》介绍,
一旦我们写好了一个 feature 文件,我们就可以使用 cucumber 命令来运行它。如果 cucumber 命令后不跟任何东西的话,那么它会执行所有的.feature 文件。如果我们只想运行某一个.feature 文件,我们可以使用命令 cucumber features\feature_name
我现在在目录D:\git\oschina\android-app\calabash\features下有两个 feature 文件:
D:\git\oschina\android-app\calabash>dir features\*.feature
 驱动器 D 中的卷是 工作
 卷的序列号是 9823-AB19

 D:\git\oschina\android-app\calabash\features 的目录

2014/09/14  21:17               775 login.feature
2014/09/15  21:20               932 startup.feature
               2 个文件          1,707 字节
               0 个目录 131,744,169,984 可用字节
login.feature 和 startup.feature,feature 的执行顺序无关紧要,因为每个 feature 运行时都要重新安装一遍 app。
D:\git\oschina\android-app\calabash>calabash-android run ..\bin\oschina-android-app.apk
将执行这两个 feature 文件。
如果只想执行 startup.feature 文件,要在 calabash-android 命令后面添加features\startup.feature :
D:\git\oschina\android-app\calabash>calabash-android run ..\bin\oschina-android-app.apk features\startup.feature
中文 Win7 环境特别说明:
如果 feature 文件名是中文的,比如:启动.feature,那么在 cmd 中 chcp 65001 后,运行命令:
D:\git\oschina\android-app\calabash>calabash-android run ..\bin\oschina-android-app.apk features\启动.feature
将报错:
invalid byte sequence in UTF-8 (ArgumentError)
中文 Win7 下中文编码统计:
- 文件名:GBK
- feature 文件内容:UTF-8
- cmd:首次测试 app 或换手机后,UTF-8,feature 中的中文显示为空白
- cmd:第二次测试 app,GBK,feature 中的中文能正确显示
Ubuntu 环境下,feature 文件名包含中文没有任何问题。
我们看一下 calabash-android 的命令参数格式:
D:\git\oschina\android-app\calabash>calabash-android
  Usage: calabash-android <command-name> [parameters] [options]
  <command-name> can be one of
    help
      prints more detailed help information.
    gen
      generate a features folder structure.
    setup
      sets up a non-default keystore to use with this test project.
    resign <apk>
      resigns the app with the currently configured keystore.
    build <apk>
      builds the test server that will be used when testing the app.
    run <apk>
      runs Cucumber in the current folder with the enviroment needed.
    version
      prints the gem version

  <options> can be
    -v, --verbose
      Turns on verbose logging
我猜想其中的[parameters]就是指 cucumber 参数
扩展 calabash 预定义指令
从环境变量读取测试数据
有一个现实的需求:
如果有一个 oschina 测试帐号要在多个 Feature 中使用,
或者我的 calabash 测试脚本共享给其他人后,他的 oschina 测试帐号要换成自己的。
如果直接修改 Feature 文件中的账号和密码,可能要修改多个地方。
所以,设想是否能扩展 calabash 预定义指令:
Then /^I enter "([^\"]*)" into input field number (\d+)$/ do |text, index|
扩展为支持从环境变量读取输入文本:
Then /^I enter \$([^\$]*) into input field number (\d+)$/ do |text_ev, index|
从文件 D:\ruby-1.9.3-p545-i386-mingw32\lib\ruby\gems\1.9.1\gems\calabash-android-0.5.1\lib\calabash-android\steps\enter_text_steps.rb 中拷贝:
Then /^I enter "([^\"]*)" into input field number (\d+)$/ do |text, index|
  enter_text("android.widget.EditText index:#{index.to_i-1}", text)
end
到 D:\git\oschina\android-app\calabash\features\step_definitions\calabash_steps.rb 中,改动后,如下:
require 'calabash-android/calabash_steps'

Then /^I enter %([^%]*)% into input field number (\d+)$/ do |text_ev, index|
  text = ENV[text_ev]
  enter_text("android.widget.EditText index:#{index.to_i-1}", text)
end

Then /^I enter \$([^\$]*) into input field number (\d+)$/ do |text_ev, index|
  text = ENV[text_ev]
  enter_text("android.widget.EditText index:#{index.to_i-1}", text)
end
这里环境变量支持两种格式:
-
%text_ev%Windows cmd 的格式 -
$text_evLinux Bash 的格式
然后运行 calabash 前,设置环境变量:
D:\git\oschina\android-app\calabash>set td_username_1=username1
D:\git\oschina\android-app\calabash>set td_password_1=123456
上述两条命令也可以放到 testdata.bat 文件中,然后执行 testdata.bat:
set td_username_1=username1
set td_password_1=123456
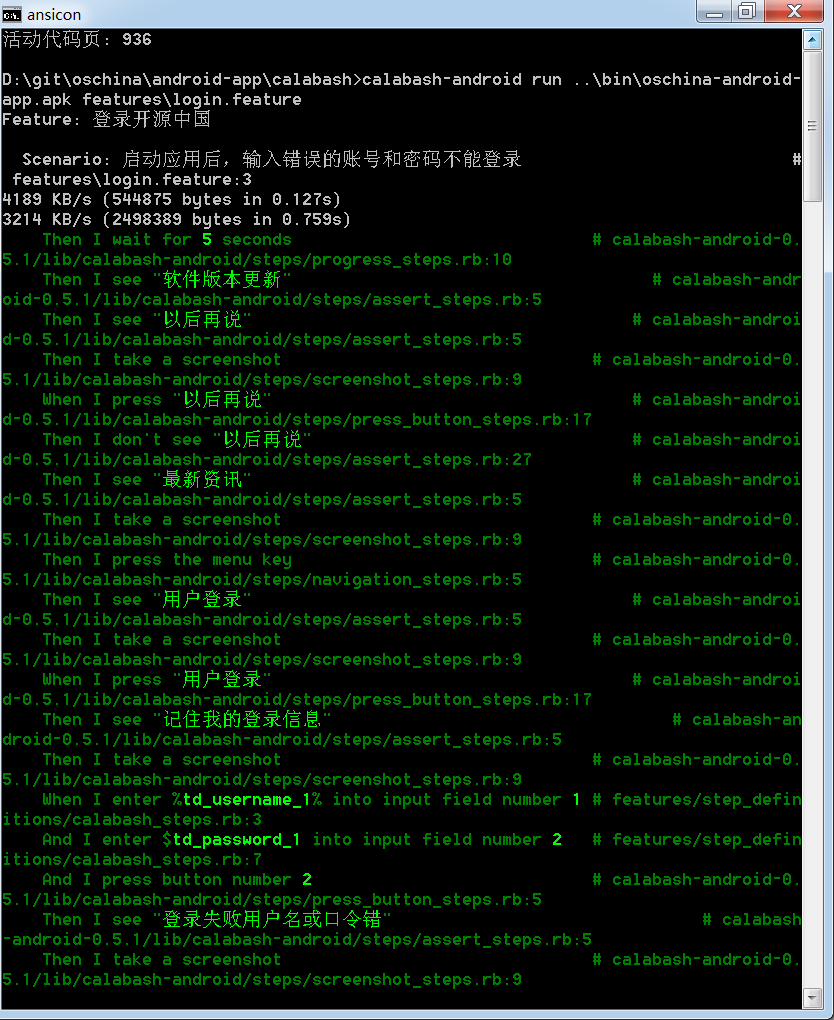
修改 login.feature :
Feature: 登录开源中国

  Scenario: 启动应用后,输入错误的账号和密码不能登录
    Then I wait for 5 seconds
    Then I see "软件版本更新"
    Then I see "以后再说"
    Then I take a screenshot
    When I press "以后再说"
    Then I don't see "以后再说"
    Then I see "最新资讯"
    Then I take a screenshot
    Then I press the menu key
    Then I see "用户登录"
    Then I take a screenshot
    When I press "用户登录"
    Then I see "记住我的登录信息"
    Then I take a screenshot
    When I enter %td_username_1% into input field number 1
    And I enter $td_password_1 into input field number 2
    And I press button number 2
    Then I see "登录失败用户名或口令错"
    Then I take a screenshot
运行 calabash:
D:\git\oschina\android-app\calabash>calabash-android run ..\bin\oschina-android-app.apk features\login.feature
为了支持跨平台测试数据维护,可以把环境变量设置放入 ruby 脚本 testdata.rb 中:
ENV["td_username_1"]="username1"
ENV["td_password_1"]="123456"
在 irb 中运行 calabash:
D:\git\oschina\android-app\calabash>irb
irb(main):001:0> require './testdata.rb'
=> true
irb(main):002:0> ENV["td_username_1"]
=> "username1"
irb(main):003:0>exec('calabash-android run ..\bin\oschina-android-app.apk features\login.feature')
Ruby 设置和读取环境变量真是太方便了,执行系统命令也很方便,不需要到处 import 库,值得深入掌握。
Linux 补充:
Linux 下可以把测试数据写入 testdata.bashrc 中:
export td_username_1="username1"
export td_password_1="123456"
enter_text_steps.rb 文件位置:
/var/lib/gems/1.9.1/gems/calabash-android-0.5.2/lib/calabash-android/steps/enter_text_steps.rb
使用 cucumber steps 封装 calabash 预定义指令
Then /^I enter \$([^\$]*) into input field number (\d+)$/ do |text_ev, index|
  text = ENV[text_ev]
  enter_text("android.widget.EditText index:#{index.to_i-1}", text)
end
等价于:
Then /^I enter \$([^\$]*) into input field number (\d+)$/ do |text_ev, index|
  text = ENV[text_ev]
  steps %{
   Then I enter "#{text}" into input field number #{index}
  }
end
说明:
steps是 cucumber 的 ruby api,用于封装其他 cucumber 指令。
%{}是 ruby 中表示多行字符串的格式。一对大括号之间的所有换行符和空格符都会原原本本的输出。
%{
  第一行
  第二行
}
等价于:
"\n 第一行\n 第二行\n "
定义指令 I ignore upgrade prompt 忽略升级提示
每次运行 feature 的第一个 scenario 时,总要忽略升级提示,第二个 scenario 时,又不要忽略升级提示,
所以我准备定义一个指令,判断如果出现升级提示,则点击忽略按钮。
忽略提示的步骤如下:
Then I see "软件版本更新"
Then I see "以后再说"
Then I take a screenshot
When I press "以后再说"
Then I don't see "以后再说"
简单封装如下:
Then /^I ignore upgrade prompt$/ do
  puts "如果出现升级提示,则点击忽略按钮"
  steps %{
    Then I see "软件版本更新"
    Then I see "以后再说"
    When I press "以后再说"
    Then I don't see "以后再说"
  }
end
上面假定一定出现升级提示,
下面,进一步判断升级提示出现后,再点击忽略按钮:
根据 calabash Ruby API https://github.com/calabash/calabash-android/blob/master/documentation/ruby_api.md
使用 element_exists(uiquery) 判断"以后再说"是否出现
Then /^I ignore upgrade prompt$/ do
  if element_exists("* {text CONTAINS[c] '以后再说'}")
    puts "看到了升级提示,取消升级完成启动"
    steps %{
      When I press "以后再说"
      Then I don't see "以后再说"
    }
  else
    puts "未看到升级提示,正常启动"
  end
end
uiquery 语法是直接从 https://github.com/calabash/calabash-android/blob/master/ruby-gem/lib/calabash-android/steps/press_button_steps.rb 里的 Then /I touch the "([\"]*)" text$/ do |text| 里拷贝的。
login.feature 应用新定义的指令:
Feature: 登录开源中国

  Scenario: 启动应用后,输入错误的账号和密码不能登录
    When I wait for 5 seconds
    And I ignore upgrade prompt
    Then I see "最新资讯"
    Then I take a screenshot

    When I press the menu key
    Then I see "用户登录"
    Then I take a screenshot

    When I press "用户登录"
    Then I see "记住我的登录信息"
    Then I take a screenshot
    When I enter %td_username_1% into input field number 1
    And I enter $td_password_1 into input field number 2
    And I press button number 2
    Then I see "登录失败用户名或口令错"
    Then I take a screenshot
具体执行结果就不贴啦,相信大家都会执行测试了。
ruby 控制台下使用 query 查询 app 当前页面的控件
参考文档:
https://github.com/calabash/calabash-android/wiki/05-Query-Syntax
http://blog.lesspainful.com/2012/12/18/Android-Query/
按照上述文档很容易查询控件的 id, 比如启动开源中国后的首页,查询结果:
D:\git\oschina\android-app\calabash>calabash-android console ..\bin\oschina-android-app.apk
irb(main):001:0> reinstall_apps
5168 KB/s (2498389 bytes in 0.472s)
3800 KB/s (544875 bytes in 0.140s)
nil
irb(main):002:0> start_test_server_in_background
nil
启动后首页弹出升级提示对话框:
irb(main):003:0> query('button')

看出问题没有,中文编码问题又来捣乱了:
"text" => "\u7ACB\u5373\u66F4\u65B0", 的中文是"立即更新",这里只能看的是 4 个中文字
"text" => "\u4EE5\u540E\u518D\u8BF4", 的中文是"以后再说"
又要说人家 Ubuntu 了,Ubuntu 下 query 结果的中文能直接显示。
在 console 下还可以点击按钮,
https://github.com/calabash/calabash-android/blob/master/ruby-gem/lib/calabash-android/steps/press_button_steps.rb 中定义了按 button 编号点击的指令 :
Then /^I press button number (\d+)$/ do |index|
  tap_when_element_exists("android.widget.Button index:#{index.to_i-1}")
end
要选择按钮"以后再说",把 #{index.to_i-1} 代成 1, 在 console 下输入:
tap_when_element_exists("android.widget.Button index:1")
然后按钮"以后再说"被点击,升级提示对话框消失了:
所以,可以放心的在 feature 文件中加入指令:
Then I press button number 2
下面还希望找到右上角搜索图标的 id,在 console 下输入:
query("*")
总共列出了 111 个控件,编号从 0 到 110,其中第 7 个是:
irb(main):008:0> query("*")
[
    ...
    [  7] {
                        "id" => "main_head_search",
                   "enabled" => true,
        "contentDescription" => nil,
                     "class" => "android.widget.ImageButton",
                      "rect" => {
            "center_y" => 90,
            "center_x" => 676,
              "height" => 80,
                   "y" => 50,
               "width" => 80,
                   "x" => 636
        },
    ...
]
根据其坐标 (x,y) = (636,50),可以确定就是右上角的搜索按钮,按钮的 id 是 main_head_search。
还可以查询本页面的 button:
query("imagebutton")
只有 1 个查询结果,就是搜索按钮:
irb(main):008:0> query("imagebutton")
[
    [0] {
                        "id" => "main_head_search",
                   "enabled" => true,
        "contentDescription" => nil,
                     "class" => "android.widget.ImageButton",
                      "rect" => {
            "center_y" => 90,
            "center_x" => 676,
              "height" => 80,
                   "y" => 50,
               "width" => 80,
                   "x" => 636
        },
                       "tag" => nil,
               "description" => "android.widget.ImageButton{42a889a0 VFED..C. ..
...... 636,0-716,80 #7f0b00a3 app:id/main_head_search}"
    }
]
接下来可以用两者方式点击搜索按钮,
第一种,对应指令是 Then I press image button number 1:
tap_when_element_exists("android.widget.ImageButton index:0")
第二种,对应指令是 Then I press "main_head_search":
tap_when_element_exists("* marked:'main_head_search'")