英文和中文 Win7(5 个工具):
32 位 Ubuntu 14.04(2 个工具):
64 位 Ubuntu 14.04(3 个工具):
说明:
sudo apt-get install lib32z1 lib32ncurses5 lib32stdc++6
Google 提供的 Android SDK Linux 64 位居然是在 32 位环境下编译的,依赖 32 位库 libz,libsdc++,而 64 位 Ubuntu 又把这些库去掉了,所以需要手工安装。
如果上天能够给我一个再来一次的机会,我会对那个女孩子说三个字:Ubuntu。如果非要在这份爱上加上一个期限,我希望是……32 位……
第一次在某手机上用 calabash-android run 测试某 app,calabash 要创建 test server,打印如下提示:
No test server found for this combination of app and calabash version. Recreating test server.
随后,在中文 Win7 环境下,会报错:
D:/ruby-1.9.3-p545-i386-mingw32/lib/ruby/gems/1.9.1/gems/calabash-android-0.5.1/lib/calabash-android/helpers.rb:105:in `scan': invalid byte sequence in GBK (ArgumentError)
解决方法:
设置 cmd 的编码为 UTF-8
chcp 65001
再次运行 calabash-android run,不再报 GBK 错误,能正确运行,但是运行结果中"登录"等中文打印为空白。
需要再次设置 cmd 的编码为 GBK:
chcp 936
并运行 calabash-android run,既不报 GBK 错误,也能正确运行,且运行结果中"登录"等中文能正确打印。
接下去,每次更换手机或者更换 app(修改代码引起重编或者换一个 app) 都要重复上面的 chcp 65001+chcp 936 的步骤。
没办法,如果忍无可忍,建议更换 Ubuntu 14.04 32 位。
在 http://my.oschina.net/fitnessefan/blog/305350 中的示例待测应用 AndroidDemoProject 的 Manifest.xml 设置了一个唯一的权限:
<uses-permission android:name="android.permission.INTERNET" />
试着把这一行去掉,然后在 Eclipse 中 Run AndroidDemoProject,一切正常。
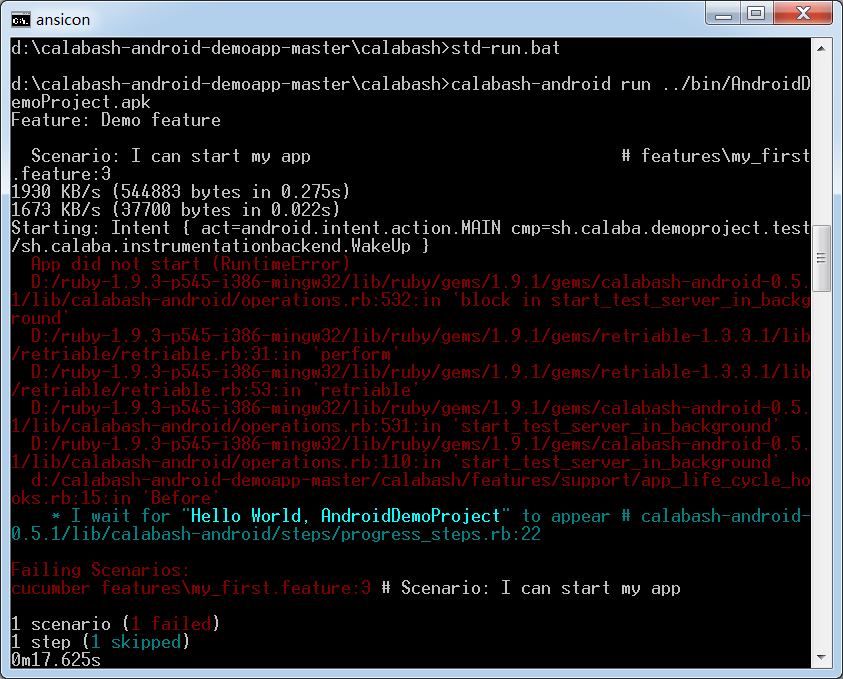
但是用 calabash-android 运行,看到错误:

d:\calabash-android-demoapp-master\calabash>calabash-android run ../bin/AndroidD
emoProject.apk
Feature: Demo feature

  Scenario: I can start my app                               # features\my_first
.feature:3
1930 KB/s (544883 bytes in 0.275s)
1673 KB/s (37700 bytes in 0.022s)
Starting: Intent { act=android.intent.action.MAIN cmp=sh.calaba.demoproject.test
/sh.calaba.instrumentationbackend.WakeUp }
  App did not start (RuntimeError)
  D:/ruby-1.9.3-p545-i386-mingw32/lib/ruby/gems/1.9.1/gems/calabash-android-0.5.
1/lib/calabash-android/operations.rb:532:in `block in start_test_server_in_backg
round'
  D:/ruby-1.9.3-p545-i386-mingw32/lib/ruby/gems/1.9.1/gems/retriable-1.3.3.1/lib
/retriable/retriable.rb:31:in `perform'
  D:/ruby-1.9.3-p545-i386-mingw32/lib/ruby/gems/1.9.1/gems/retriable-1.3.3.1/lib
/retriable/retriable.rb:53:in `retriable'
  D:/ruby-1.9.3-p545-i386-mingw32/lib/ruby/gems/1.9.1/gems/calabash-android-0.5.
1/lib/calabash-android/operations.rb:531:in `start_test_server_in_background'
  D:/ruby-1.9.3-p545-i386-mingw32/lib/ruby/gems/1.9.1/gems/calabash-android-0.5.
1/lib/calabash-android/operations.rb:110:in `start_test_server_in_background'
  d:/calabash-android-demoapp-master/calabash/features/support/app_life_cycle_ho
oks.rb:15:in `Before'
    * I wait for "Hello World, AndroidDemoProject" to appear # calabash-android-
0.5.1/lib/calabash-android/steps/progress_steps.rb:22

Failing Scenarios:
cucumber features\my_first.feature:3 # Scenario: I can start my app

1 scenario (1 failed)
1 step (1 skipped)
0m17.625s
到 ADT 的 LogCat 中查看:

可以看到权限不够的提示。我猜是安装在手机的 test-server 要通过 socket 发送待测 Apk 的状态回电脑,但是没有访问 socket 权限,崩了。
在 ADT 中 Export Andriod Application > Create new keystore,生成 AndroidDemoProject-release.apk 后,
使用 calabash-android 测试该 apk,报如下信息:
d:\calabash-android-demoapp-master\calabash>calabash-android run ../bin/AndroidD
emoProject-release.apk
No test server found for this combination of app and calabash version. Recreatin
g test server.
d:/calabash-android-demoapp-master/bin/AndroidDemoProject-release.apk is not sig
ned with any of the available keystores.
Tried the following keystores:
C:/Users/asus/.android/debug.keystore

You can resign the app with C:/Users/asus/.android/debug.keystore by running:
    calabash-android resign d:/calabash-android-demoapp-master/bin/AndroidDemoPr
oject-release.apk

Notice that resigning an app might break some functionality.
Getting a copy of the certificate used when the app was build will in general be
 more reliable.
结论是:只有 debug 签名的 apk 才能用 calabash-android 测试
你可以:
1、拿到源代码,在 Eclipse 中运行一次,就自动编译出来了。
2、或者拿到别人已经编译好的 debug 签名的 apk。
所以,每个 featue 文件的第一个 Scenario,需要做初装 apk 后的操作,比如:
featue 文件的第二个 Scenario 开始,就可以测试第二次打开以后的功能了。
