uiautomator2 采用架构如下
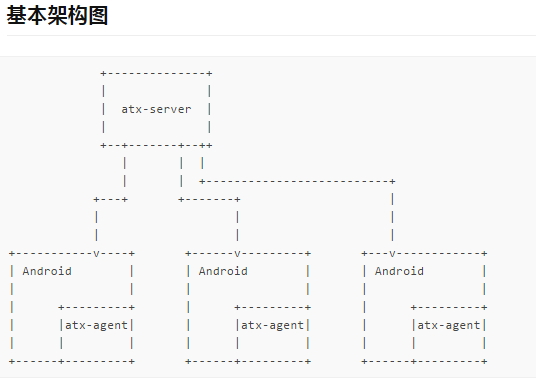
采用这个自动化测试框架原因:
1.server+agent 模式,连接稳定性 +++
2.网络形式驱动手机执行,无需设备连接到 pc 上
3.adb 截的图是 3M,而 uiautomator2 使用 minicap 截图是 175K
背景
uiautomator2 采用架构如下
采用这个自动化测试框架原因:
1.server+agent 模式,连接稳定性 +++
2.网络形式驱动手机执行,无需设备连接到 pc 上
3.adb 截的图是 3M,而 uiautomator2 使用 minicap 截图是 175K
安装及使用
1.安装 python package
pip install --pre uiautomator2
pip install pillow
2.Push and install (apk, atx-agent, minicap, minitouch) to device
电脑连接上一个手机或多个手机, 确保 adb 已经添加到环境变量中,执行下面的命令会自动安装 uiautomator-apk 以及 atx-agent
python -m uiautomator2 init
安装提示 success 即可
安装 apk 过程中,不知是服务器网络卡还是我们网络卡。下载失败好几次,重试几次后终于安装成功。
手机安装 uiautomator2 agent 后,电脑 uiautomatorviewer.bat 无法抓取到控件。需要用对口的软件进行控件分析
安装 webitor
pip install --pre weditor
启动 webitor
python -m weditor
接下来是学习官网上封装好的函数
https://github.com/openatx/uiautomator2
小编试用时,无法抓取 adb logcat 日志,坐等 uiautomator2 解决。
