http://127.0.0.1:5000/api/users/1000
书接上回,各表两支
ubuntu16.04.3 python 多版本改造与 HttpRunner 部署
http://httprunner.readthedocs.io/en/latest/quickstart.html
项目中的 tests 目录有一个 api_server.py 接口 API 样例服务
为了得到该 api_server.py 先 git 该项目
cmd@TR:~/workspace/git$ git clone https://github.com/HttpRunner/HttpRunner.git
正克隆到 'HttpRunner'...
remote: Counting objects: 2226, done.
remote: Compressing objects: 100% (29/29), done.
remote: Total 2226 (delta 39), reused 66 (delta 38), pack-reused 2156
接收对象中: 100% (2226/2226), 687.89 KiB | 273.00 KiB/s, 完成.
处理 delta 中: 100% (1616/1616), 完成.
检查连接... 完成。
cmd@TR:~/workspace/git$ ls
AppCrawler  fcitx-qt5  HttpRunner  macaca-java-biz-sample  PatatiumAppUi  wd.java
cmd@TR:~/workspace/git$ cd HttpRunner/
cmd@TR:~/workspace/git/HttpRunner$ ls -al
总用量 64
drwxrwxr-x 7 cmd cmd 4096 12月 22 14:16 .
drwxrwxrwx 8 cmd cmd 4096 12月 22 14:16 ..
drwxrwxr-x 4 cmd cmd 4096 12月 22 14:16 docs
drwxrwxr-x 2 cmd cmd 4096 12月 22 14:16 examples
drwxrwxr-x 8 cmd cmd 4096 12月 22 14:16 .git
-rw-rw-r-- 1 cmd cmd  133 12月 22 14:16 .gitignore
drwxrwxr-x 2 cmd cmd 4096 12月 22 14:16 httprunner
-rw-rw-r-- 1 cmd cmd 1064 12月 22 14:16 LICENSE
-rw-rw-r-- 1 cmd cmd   75 12月 22 14:16 main-ate.py
-rw-rw-r-- 1 cmd cmd   81 12月 22 14:16 main-locust.py
-rw-rw-r-- 1 cmd cmd   43 12月 22 14:16 MANIFEST.in
-rw-rw-r-- 1 cmd cmd 3022 12月 22 14:16 README.rst
-rw-rw-r-- 1 cmd cmd   44 12月 22 14:16 requirements.txt
-rw-rw-r-- 1 cmd cmd 1258 12月 22 14:16 setup.py
drwxrwxr-x 4 cmd cmd 4096 12月 22 14:16 tests
-rw-rw-r-- 1 cmd cmd  259 12月 22 14:16 .travis.yml
然后到 pyenv363 环境启动服务 ,需要 Flask-Script 支持
(pyenv363) cmd@TR:~$ pip install Flask-Script
Collecting Flask-Script
  Downloading Flask-Script-2.0.6.tar.gz (43kB)
    100% |████████████████████████████████| 51kB 62kB/s
Requirement already satisfied: Flask in ./.pyenv/versions/3.6.3/envs/pyenv363/lib/python3.6/site-packages (from Flask-Script)
Requirement already satisfied: Jinja2>=2.4 in ./.pyenv/versions/3.6.3/envs/pyenv363/lib/python3.6/site-packages (from Flask->Flask-Script)
Requirement already satisfied: click>=2.0 in ./.pyenv/versions/3.6.3/envs/pyenv363/lib/python3.6/site-packages (from Flask->Flask-Script)
Requirement already satisfied: itsdangerous>=0.21 in ./.pyenv/versions/3.6.3/envs/pyenv363/lib/python3.6/site-packages (from Flask->Flask-Script)
Requirement already satisfied: Werkzeug>=0.7 in ./.pyenv/versions/3.6.3/envs/pyenv363/lib/python3.6/site-packages (from Flask->Flask-Script)
Requirement already satisfied: MarkupSafe>=0.23 in ./.pyenv/versions/3.6.3/envs/pyenv363/lib/python3.6/site-packages (from Jinja2>=2.4->Flask->Flask-Script)
Installing collected packages: Flask-Script
  Running setup.py install for Flask-Script ... done
Successfully installed Flask-Script-2.0.6
尝试启动,报找不到
(pyenv363) cmd@TR:~$ export FLASK_APP=tests/api_server.py
(pyenv363) cmd@TR:~$ flask run
Usage: flask run [OPTIONS]
Error: The file/path provided (tests/api_server.py) does not appear to exist.  Please verify the path is correct.  If app is not on PYTHONPATH, ensure the extension is .py
此处注意 一定要先 cd 切换到该目录/workspace/git/HttpRunner/ 也就是 tests 目录的上一级处再执行 export 和 flask run 方可正常开启模拟 API Server
(pyenv363) cmd@TR:~/workspace/git/HttpRunner$ export FLASK_APP=tests/api_server.py
(pyenv363) cmd@TR:~/workspace/git/HttpRunner$ flask run
* Serving Flask app "tests.api_server"
* Running on http://127.0.0.1:5000/ (Press CTRL+C to quit)
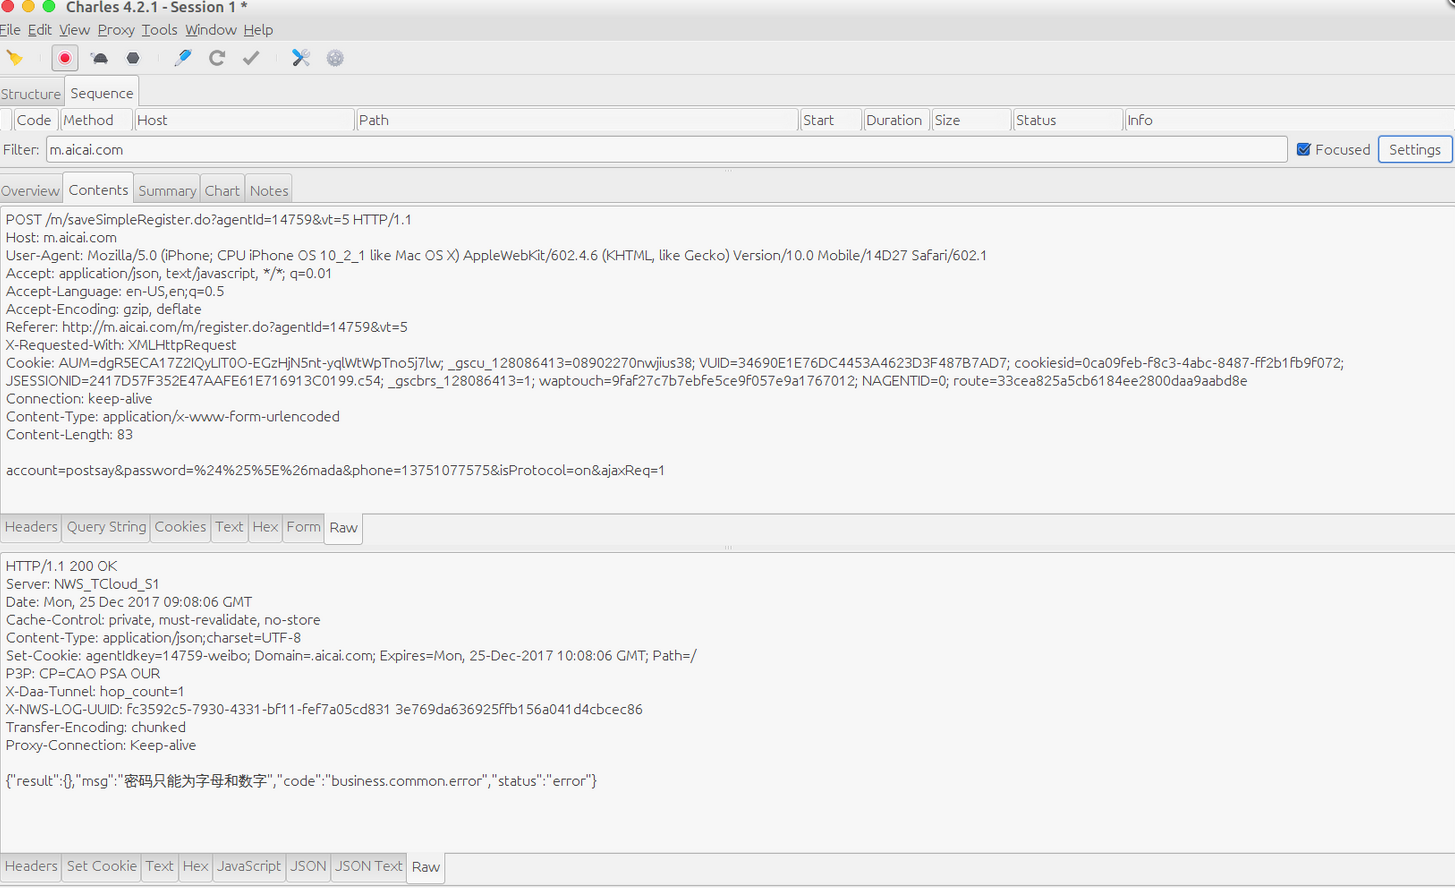
127.0.0.1 - - [26/Dec/2017 10:15:01] "GET /api/users/1000 HTTP/1.1" 401 -
127.0.0.1 - - [26/Dec/2017 10:15:28] "GET /api/get-token HTTP/1.1" 405 -
然后才可以正常访问
http://127.0.0.1:5000/api/get-token
http://127.0.0.1:5000/api/users/1000
测试目录存放样例 API Server
https://github.com/HttpRunner/HttpRunner/tree/master/tests
样例 API Server 的 test case 目录
https://github.com/HttpRunner/HttpRunner/tree/master/examples
样例服务的存放脚本在路径:
(pyenv363) cmd@TR:~/workspace/git/HttpRunner/examples$ ls
debugtalk.py quickstart-demo-rev-0.yml quickstart-demo-rev-2.yml
init.py quickstart-demo-rev-1.yml quickstart-demo-rev-3.yml
执行 ate quickstart-demo-rev-1.yml 或 httprunner quickstart-demo-rev-1.yml 执行 test case
(pyenv363) cmd@TR:~/workspace/git/HttpRunner/examples$ httprunner quickstart-demo-rev-1.yml

Running tests...
----------------------------------------------------------------------
 get token ... INFO:root: Start to POST http://127.0.0.1:5000/api/get-token
INFO:root: status_code: 200, response_time: 25 ms, response_length: 46 bytes
OK (0.026967)s
 create user which does not exist ... INFO:root: Start to POST http://127.0.0.1:5000/api/users/1001
INFO:root: status_code: 201, response_time: 5 ms, response_length: 54 bytes
OK (0.005989)s
----------------------------------------------------------------------
Ran 2 tests in 0.033s
OK
可自行测试学习
我们也可以自行测试某一网站比如 H5 常规注册 API
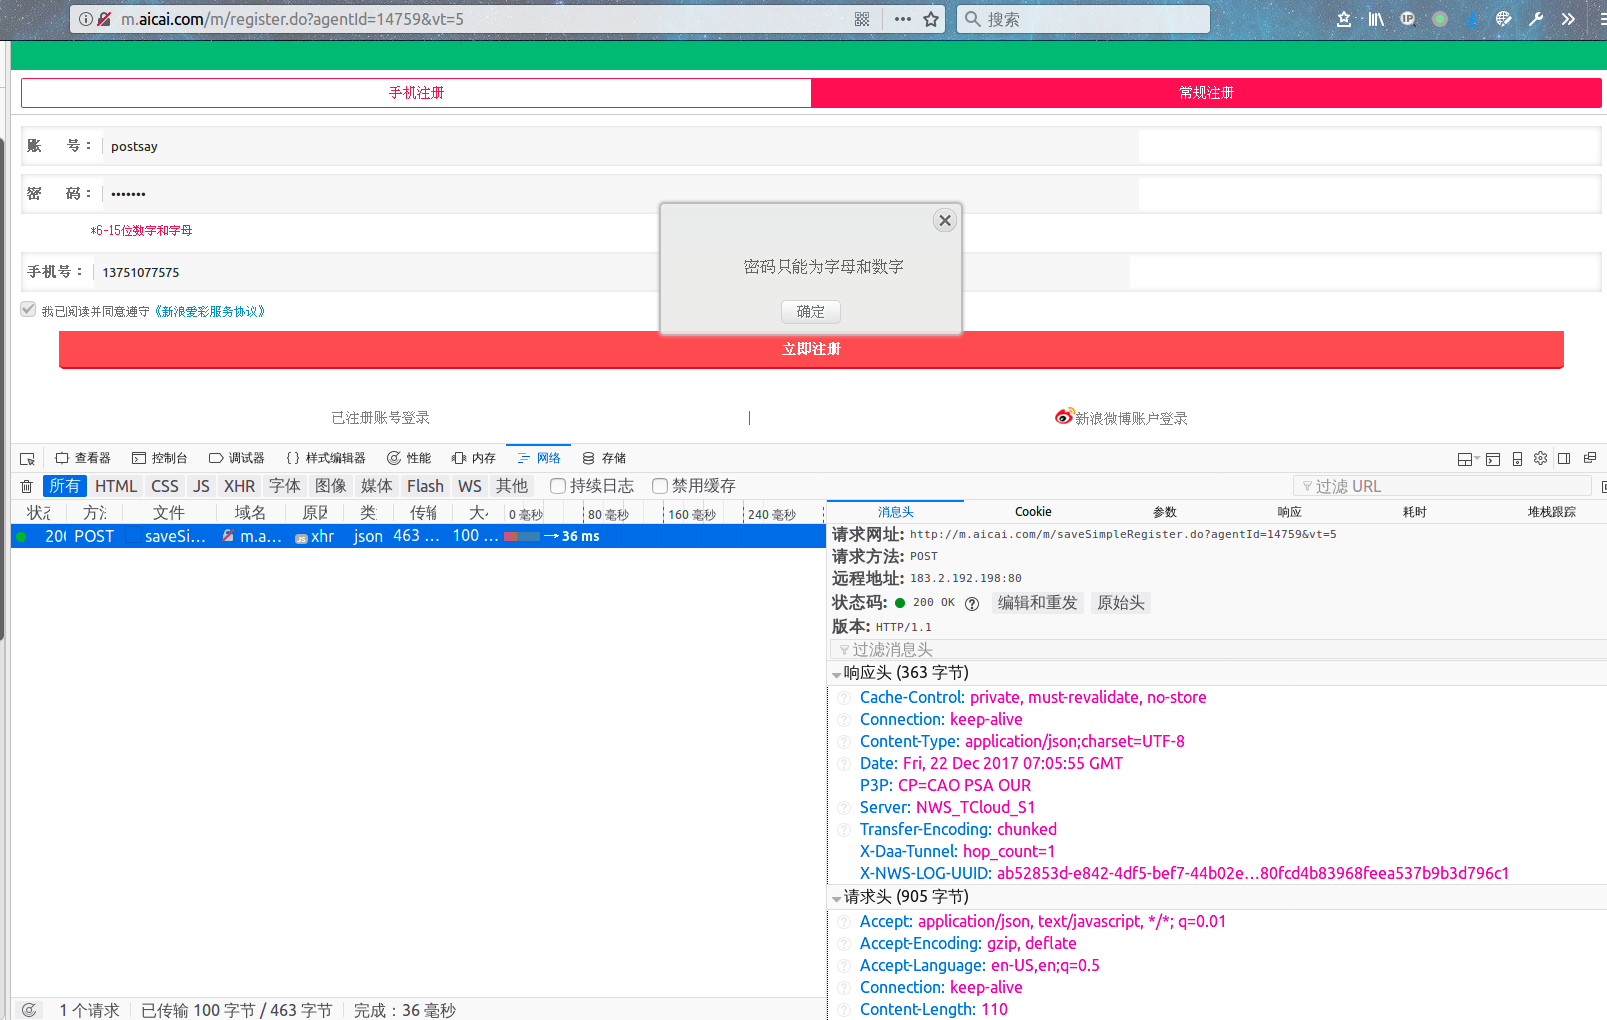
访问地址 http://m.aicai.com/m/register.do?agentId=14759&vt=5 添加账号 非法密码 手机号 提交 立即注册
请求网址 http://m.aicai.com/m/saveSimpleRegister.do?agentId=14759&vt=5
下图为 postman 的 常规注册测试。你也可以用它来查看请求 请求头 Headers 请求体 Body 字段。同时 HttpRunner 今后也将支持
Integrate with PostMan: convert Postman Collection Format to YAML testcases.
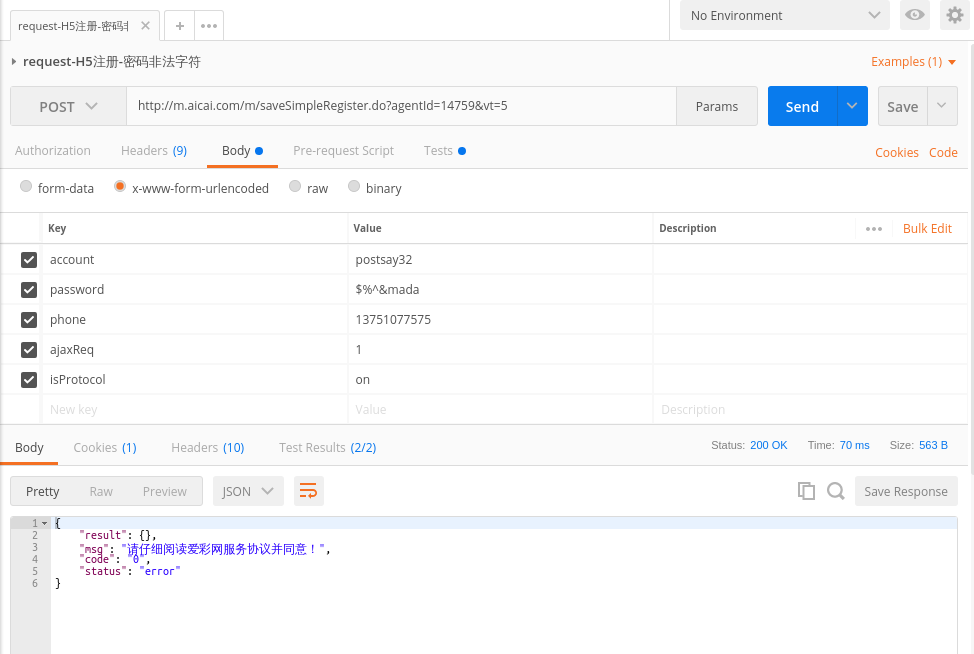
已经替代 firebug
比如根据以上工具查看接口请求与响应得到的信息 我们可以如下:
- test:
    name: regist user which passwd is wrong
    request:
        url: http://m.aicai.com/m/saveSimpleRegister.do?agentId=14759&vt=5
        method: POST
        headers:
            User-Agent: 'iOS/10.3'
            token: content.token
        json:
            account: "postsay1"
            password: "%^&*()"
            phone: "13751077575"
            isProtocol: on
            ajaxReq: 1
    validate:
#        - {"check": "status_code", "comparator": "eq", "expect": 200}
#        - {"check": "content.status", "comparator": "eq", "expect": error}
#        - {"check": "content.msg", "comparator": "str_eq", "expect": 请仔细阅读爱彩网服务协议并同意!}
        - eq: ["status_code" , 200]
        - eq: ["content.status" , error]
        - eq: ["content.msg" , 请仔细阅读爱彩网服务协议并同意!]
(注释掉的 valiadate 两种写法都有效)
保存脚本到某一路径下,切换到该路径下执行 httprunner 命令或 ate 命令即可执行 testcase 脚本
(pyenv363) cmd@TR:~/scripts/locust$ httprunner ac-h5.yml
Running tests...
----------------------------------------------------------------------
regist user which passwd is wrong ... INFO:root: Start to POST http://m.aicai.com/m/saveSimpleRegister.do?agentId=14759&vt=5
INFO:root: status_code: 200, response_time: 46 ms, response_length: 98 bytes
OK (0.048034)s
----------------------------------------------------------------------
Ran 1 test in 0.048s
OK
Generating HTML reports...
Template is not specified, load default template instead.
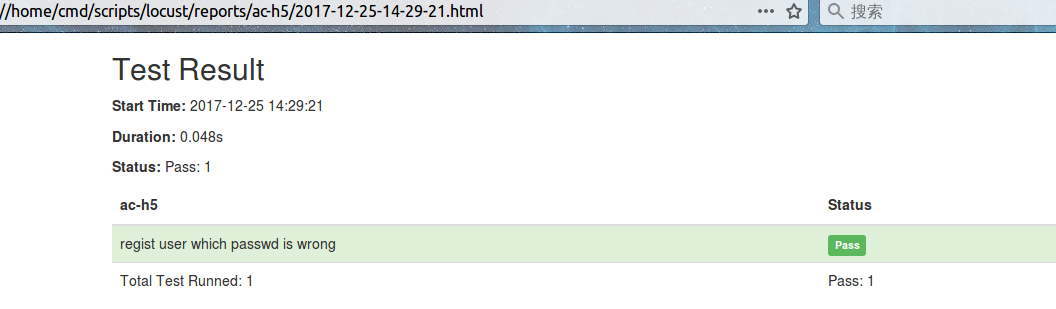
Reports generated: /home/cmd/scripts/locust/reports/ac-h5/2017-12-25-14-29-21.html
同时有结果报告在脚本同目录下。
http://httprunner.readthedocs.io/en/latest/load-test.html
为了支持 locusts 做性能测试 我们还需要单独安装下 locusts
(pyenv363) cmd@TR:~$ pip install git+https://github.com/locustio/locust.git@master#egg=locustio

(pyenv363) cmd@TR:~$ locusts -V

[2017-12-22 17:15:15,642] TR/INFO/stdout: Locust 0.8.1

[2017-12-22 17:15:15,642] TR/INFO/stdout:
https://testerhome.com/topics/9832
既然说了已经包含了 locust 为什么还要单独安装 看这篇即可明白。作者只是写了个 locustfile.py。
第二种,就是生成 locustfile.py 这样一个中间文件,然后将文件路径传给 Locust。这样的好处在于我们可以不改变 Locust 的任何地方,直接对其进行使用。与 Locust 的传统使用方式差异在于,之前我们是在 Terminal 中通过参数启动 Locust,而现在我们是在 ApiTestEngine 框架中通过 Python 代码启动 Locust。
具体地,我在 setup.py 的 entry_points 中新增了一个命令 locusts,并绑定了对应的程序入口。
最后
安装 httprunner 后,系统中就具有了 locusts 命令,使用方式跟 Locust 框架的 locust 几乎完全相同,我们完全可以使用 locusts 命令代替原生的 locust 命令。
例如,下面的命令执行效果与 locust 完全一致。
$ locusts -V
$ locusts -h
$ locusts -f locustfile.py
$ locusts -f locustfile.py --master -P 8088
$ locusts -f locustfile.py --slave &
差异在于,locusts 具有更加丰富的功能。
在 httprunner 中编写的 YAML/JSON 格式的接口测试用例文件,直接运行就可以启动 Locust 运行性能测试。
实际有点差别 一个是 locust 一个是 httprunner 的 locusts 多了个 s