上一篇为大家介绍了如何通过 appium 桌面客户端的方式来快速搭建 appium 环境,桌面客户端的 appium 版本目前为 1.6.4,更新稍慢于 appium 项目,但目前已经支持在线更新,大家不用再有客户端版本过低的顾虑。
接下来将介绍如何使用 python 来开发 appium 功能测试脚本,包括启动、控件定位、操作、函数封装、组织用例五个部分。
Appium 启动时需要指定一些通用配置,统称为 Desired Capabilities,具体的一些参数可以参考 Appium 服务器初始化参数。这里介绍一些通用的参数与一些常见的问题。
automationName
自动化测试的引擎,Appium(默认)、Selendroid、Uiautomator2。Appium 使用的是 UI Automator v1,相比之下 UI Automator v2 修复了一些 v1 的 bug,在结构上也有一些优化。对于 Android7.0 以上的系统,UI Automator v1 可能在查找控件时出现超时导致 appium 服务端报错,这时候可以考虑改用 Uiautomator2。
platformName
手机操作系统。
platformVersion
手机操作系统版本。
deviceName
手机类型
app
待测 app 的路径
newCommandTimeout
两条 appium 命令间的最长时间间隔,若超过这个时间,appium 会自动结束并退出 app
noReset, fullReset
noReset 不要在会话前重置应用状态。默认值 false。 fullReset (Android) 通过卸载而不是清空数据来重置应用状态。在 Android 上, 这也会在会话结束后自动清除被测应用。默认值 false。
unicodeKeyboard, resetKeyboard
在输入的时候,可能出现键盘挡住控件的情况,这时候需要使用 appium 提供的输入法(支持输入多语言,没有键盘 ui ),unicodeKeyboard 为 true 表示使用 appium-ime 输入法。 resetKeyboard 表示在测试结束后切回系统输入法。
appActivity, appPackage
appActivity 与 appPackage 指用于启动待测 app 的 activityName 与 packageName,appium(1.6.4)已经支持 activityName 与 packageName 的自动检测,这两个参数已经可以省略了
appWaitActivity, appWaitPackage
appium 需要等待的 activityName 与 packageName,与 appActivity 不同的是,对于有启动动画的 app 来说,appWaitActivity 应该是启动 activity 消失后出现的 activity。这两个参数可以指定多个。
有了以上介绍的这些参数,我们可以启动 appium 并开始测试 app 了。将 desired capibilities 进行封装,python 脚本如下:
from appium import webdriver

def get_desired_capabilities():
    desired_caps = {
        'platformName': 'Android',
        'platformVersion': '18',
        'deviceName': 'mqcDevice',
        'udid': 'a05aacaf7d53',
        'app': "D:\\appium\\alicrowdtest.apk",
        'newCommandTimeout': 60,
        'automationName': 'appium',
        'unicodeKeyboard': True,
        'resetKeyboard': True,
        'appWaitActivity': 'com.yunos.mqc.view.activity.MainActivity',
    }

    return desired_caps

def setUp():
    # 获取我们设定的capabilities,通知Appium Server创建相应的会话。
    desired_caps = get_desired_capabilities()
    # 获取server的地址。
    uri = "http://localhost:4723/wd/hub"
    # 创建会话,得到driver对象,driver对象封装了所有的设备操作。下面会具体讲。
    driver = webdriver.Remote(uri, desired_caps)
    return driver

if __name__ == '__main__':
    driver = setUp()
    // 打印当前activity
    print driver.current_activity
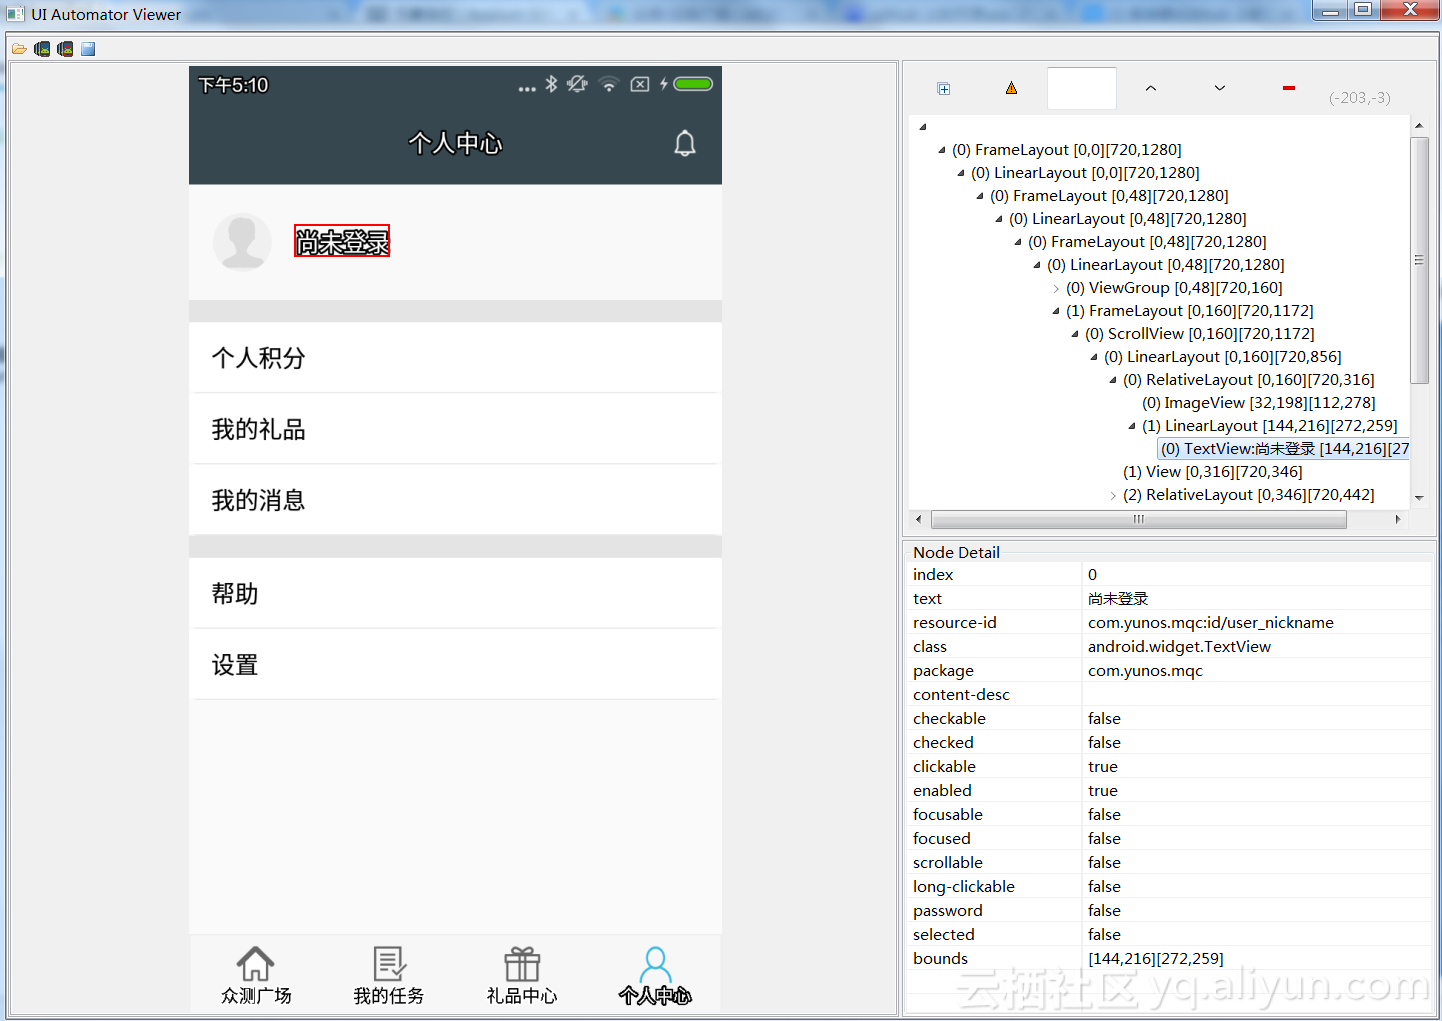
android sdk 的 tools 目录下自带一个元素查看工具-uiautomatorviewer,通过这个工具可以获取到 app 的各个元素属性,辅助我们编写相关的脚本,uiautomatorviewer 的界面如下:
如图为了定位 尚未登录 这个控件,我们推荐以下几种方法:
driver.find_element_by_xpath("//android.widget.LinearLayout[1]/android.widget.FrameLayout[1]/android.widget.ScrollView[1]/android.widget.LinearLayout[1]/android.widget.RelativeLayout[1]/android.widget.LinearLayout[1]/1android.widget.TextView[1]")
driver.find_element_by_id("com.yunos.mqc:id/user_nickname")
或者
driver.find_elements_by_id("com.yunos.mqc:id/user_nickname")[index]
#1.5以上的版本已弃用
driver.find_element_by_name("尚未登录")
#新版appium使用xpath来实现这个功能
driver.find_element_by_xpath("//*[@text='%s']" % (text))
window_size = driver.get_window_size()
driver.swipe(start_x=window_size["width"] * 0.9,
             start_y=window_size["height"] * 0.5,
             end_x=window_size["width"] * 0.1,
             end_y=window_size["height"] * 0.5, 500)
#点击操作
TouchAction(driver).press(None, x, y).release().perform()
#滑动操作
TouchAction(driver).press(None, x, y).wait(20).move_to(None, dx, dy).release().perform()
#从控件 el1 滑动到 el2
driver.scroll(el1, el2)
#HOME 键
driver.keyevent(3)
#长按 el 控件 20s
action = TouchAction(driver)
action.long_press(el, 20000).perform()
sleep(20)
action.release().perform()
# python
driver.hide_keyboard()
在写脚本的时候,把一些常用的功能合理封装起来,能够大大提高脚本执行的成功率。
def swipe(points):
    last_x = 0
    last_y = 0
    swipe_action = TouchAction(driver)
    for i in range(0, len(points)):
        x=points[i][0]
        y=points[i][1]
        if i == 0:
            swipe_action = swipe_action.press(None, x, y).wait(20)
        elif i == (len(points) - 1):
            swipe_action = swipe_action.move_to(None, x - last_x, y - last_y).release()
            swipe_action.perform()
        else:
            swipe_action = swipe_action.move_to(None, x - last_x, y - last_y).wait(20)
        last_x = x
        last_y = y
appium 本身有提供 waitUntil 的 api,现在要找图中的 个人中心 控件,使用显示等待的方法如下:
from appium import webdriver
from selenium.webdriver.common.by import By
from selenium.webdriver.support.ui import WebDriverWait # available since 2.4.0
from selenium.webdriver.support import expected_conditions as EC

#通过xpath的方式搜索
element1 = WebDriverWait(driver, 3).until(EC.presence_of_element_located((By.XPATH,
"//android.widget.FrameLayout[1]/android.widget.LinearLayout[1]/android.widget.FrameLayout[1]/android.widget.LinearLayout[1]/android.widget.FrameLayout[1]/android.widget.LinearLayout[1]/android.widget.TabHost[1]/android.widget.LinearLayout[1]/android.widget.TabWidget[1]/android.view.View[4]")))

#通过resource-id的方式搜索,这里底部导航的resource-id是相同,需要通过下标来区分,搜出多个elements后,需要指定需要的下标
element2 = WebDriverWait(driver, 3).until(EC.presence_of_all_elements_located((By.ID, "com.yunos.mqc:id/id_indicator_discovery")))
element2[3].click()
我们也可以封装一个多方式定位控件的函数,这里需要自己把握超时时间
import time
from time import sleep
def wait_for_element(xpath=None, id=None, text=None, index=None, timeout=3):
    startTime = time.time()
    nowTime = time.time()
    while nowTime - startTime < timeout:
        # 通过 xpath 查找控件
        try:
            if xpath is not None:
                el = driver.find_element_by_xpath(xpath)
                return el
        except:
            pass

        # 通过 id 查找控件
        try:
            if id is not None:
                if index is not None:
                    return driver.find_elements_by_id(self.id(id))[index]
                else:
                    return driver.find_element_by_id(self.id(id))
        except:
            pass

        # 通过 text 查找控件
        try:
            if text is not None:
                return driver.find_element_by_name(text)
        except:
            pass

        sleep(1)
        nowTime = time.time()
    raise Exception("Element id[%s] text[%s]" % (id, text))
unittest 是 python 的一个单元测试框架,它可以帮助我们有效组织用例,把用例的不同部分区分开来。结合已经封装好的函数,我们写一个登录的测试脚本:
# -*- coding: UTF-8 -*-
import unittest
import time
import sys

from appium import webdriver
from time import sleep
from unittest import TestCase
from appium.webdriver.common.touch_action import TouchAction
from selenium.webdriver.common.touch_actions import TouchActions

class MqcAppium(TestCase):
    #设备宽高
    global width
    global height

    def get_desired_capabilities(self):
        desired_caps = {
            'platformName': 'Android',
            'platformVersion': '18',
            'deviceName': 'mqcDevice',
            'udid': 'a05aacaf7d53',
            'app': "D:\\appium\\test.apk",
            'newCommandTimeout': 600,
            'automationName': 'appium',
            'unicodeKeyboard': True,
            'resetKeyboard': True,
            'appWaitActivity': 'com.yunos.mqc.view.activity.MainActivity',
        }

        return desired_caps

    #unittest 启动
    def setUp(self):
        desired_caps = self.get_desired_capabilities()
        uri = "http://localhost:4723/wd/hub"
        retry = 0
        while retry < 2:
            try:
                self.driver = webdriver.Remote(uri, desired_caps)
                break
            except Exception, e:
                retry += 1
                if retry == 2:
                    raise e
        sleep(10)
        # 获取当前设备分辨率
        self.window_size  = self.driver.get_window_size()
        self.width = self.window_size["width"]
        self.height = self.window_size["height"]

    # unittest 用例,用 test_**** 命名
    def test_login(self):
        #大部分app启动后会有动画,启动延迟等,视情况预留启动延迟
        sleep(5)

        #通过 resource-id 与 index 查找 个人中心 控件
        navPerson = self.wait_for_element(id="com.yunos.mqc:id/id_indicator_discovery", index=3);
        navPerson.click()

        #通过 text 查找 尚未登录
        noLogin = self.wait_for_element(xpath=("//*[@text='%s']" % ("尚未登录")));
        noLogin.click()

        #通过 xpath、resource-id 多种方式定位登录控件,避免有些手机上 xpath 失效或者不一致的情况
        inputUsername = self.wait_for_element(xpath="//android.widget.FrameLayout[1]/android.widget.LinearLayout[1]/android.widget.FrameLayout[1]/android.widget.LinearLayout[1]\
        /android.widget.FrameLayout[1]/android.widget.LinearLayout[1]/android.widget.LinearLayout[1]/android.widget.EditText[1]", id="com.yunos.mqc:id/custom_account")
        inputUsername.click()
        inputUsername.send_keys("mqc_test")

        inputPassword = self.wait_for_element(xpath="//android.widget.FrameLayout[1]/android.widget.LinearLayout[1]/android.widget.FrameLayout[1]/android.widget.LinearLayout[1]/\
        android.widget.FrameLayout[1]/android.widget.LinearLayout[1]/android.widget.LinearLayout[1]/android.widget.EditText[2]", id="com.yunos.mqc:id/custom_passwd")
        inputPassword.click()
        inputPassword.send_keys("123456")

        login = self.wait_for_element(id="com.yunos.mqc:id/custom_loginBtn")
        login.click()

        #返回 广场 并且向下滑动
        navGround = self.wait_for_element(id="com.yunos.mqc:id/id_indicator_discovery", index=0);
        navGround.click()

        #与前文 swipe 函数不同的是,为了兼容不同分辨率的手机,滑动操作应当使用 比例 而非 绝对坐标,当然,若是需要精确地滑动操作,建议使用scrollTo
        self.swipe([[0.5, 0.7], [0.5, 0.6], [0.5, 0.5], [0.5, 0.4], [0.5, 0.3]])

    def tearDown(self):
        try:
            self.driver.quit()
        except:
            pass

    def swipe(self, points):
        last_x = 0
        last_y = 0
        swipe_action = TouchAction(self.driver)
        for i in range(0, len(points)):
            x=float(points[i][0]) * self.width
            y=float(points[i][1]) * self.height
            if i == 0:
                swipe_action = swipe_action.press(None, x, y).wait(20)
            elif i == (len(points) - 1):
                swipe_action = swipe_action.move_to(None, x - last_x, y - last_y).release()
                swipe_action.perform()
            else:
                swipe_action = swipe_action.move_to(None, x - last_x, y - last_y).wait(20)
            last_x = x
            last_y = y

    def wait_for_element(self, xpath=None, id=None, index=None, timeout=3):
        startTime = time.time()
        nowTime = time.time()
        while nowTime - startTime < timeout:
            # 通过 xpath 查找控件
            try:
                if xpath is not None:
                    el = self.driver.find_element_by_xpath(xpath)
                    return el
            except:
                pass

            # 通过 id 查找控件
            try:
                if id is not None:
                    if index is not None:
                        return self.driver.find_elements_by_id(id)[index]
                    else:
                        return self.driver.find_element_by_id(id)
            except:
                pass

            sleep(1)
            nowTime = time.time()
        raise Exception("Element xpath[%s] id[%s] index[%s] not found" % (xpath, id, index))

if __name__ == '__main__':
    try: unittest.main()
    except SystemExit: pass
